Stir Fried Rice w/Nopalitos and Sonal’s Curry Masala

Who doesn’t like stir-fried rice? It’s easy to prepare and lends itself to endless delicious variations. As a vegan (going on 1 1/2 years) stir fried rice is a meal I find myself going back to very often. It makes for a quick and easy lunch at my restaurant job. Cooked rice is already set aside. Prepping the veggies and stir frying is done in a matter of a few minutes. My vegan diet forces me to try new flavors all the time so I’ll different styles for variety. Indian stir fries are one way I am learning how to blend curry spices. I usually start with coriander, ginger and turmeric, and add one, two, maybe three other spices. Eventually I’ll learn how to add 5 or more but for now I’m ok with my simple versions. I always take notice when someone can whip up a complex blend of curry spice. Enter Sonal from simplyvegetarian777. She was so nice to send me some of her incredible Masala curry blend. I knew I wanted to post something featuring it, but I didn’t want to do a strictly Indian dish, there are plenty of top-notch recipes, including those from Sonal. I enjoy a Mexican style rice stir fry often, usually lightly spicing up the dish with a ground chilles, serrano pepper, oregano, cilantro or comino for example. In fact, nopalitos rice stir fry has become one of the most tasty and satisfying meals I’ve eaten in recent times. It finally occurred to me to use Sonal’s blend. I made a quick sample of cactus stir fry with a very simple spice mix and immediately knew this would work nicely to feature her blend. Let me tell you, the combination of cactus and Sonal’s masala curry spice makes for a most memorable tasting dish. I can’t tell you what spices she used, I think there is a bit a cinnamon in there that gives it a kind of warm sweet flavor. Correct me if I’m wrong Sonal! I never would have thought of adding that type of spice in my cactus stir fry. It works fantastically! So delicious and aromatic! Thank you Sonal!! I must also mention that her fusion of Indian and Tex-Mex ingredients and techniques that she has presented on simplyvegetarian777 has been inspirational and the first I’ve seen anywhere!
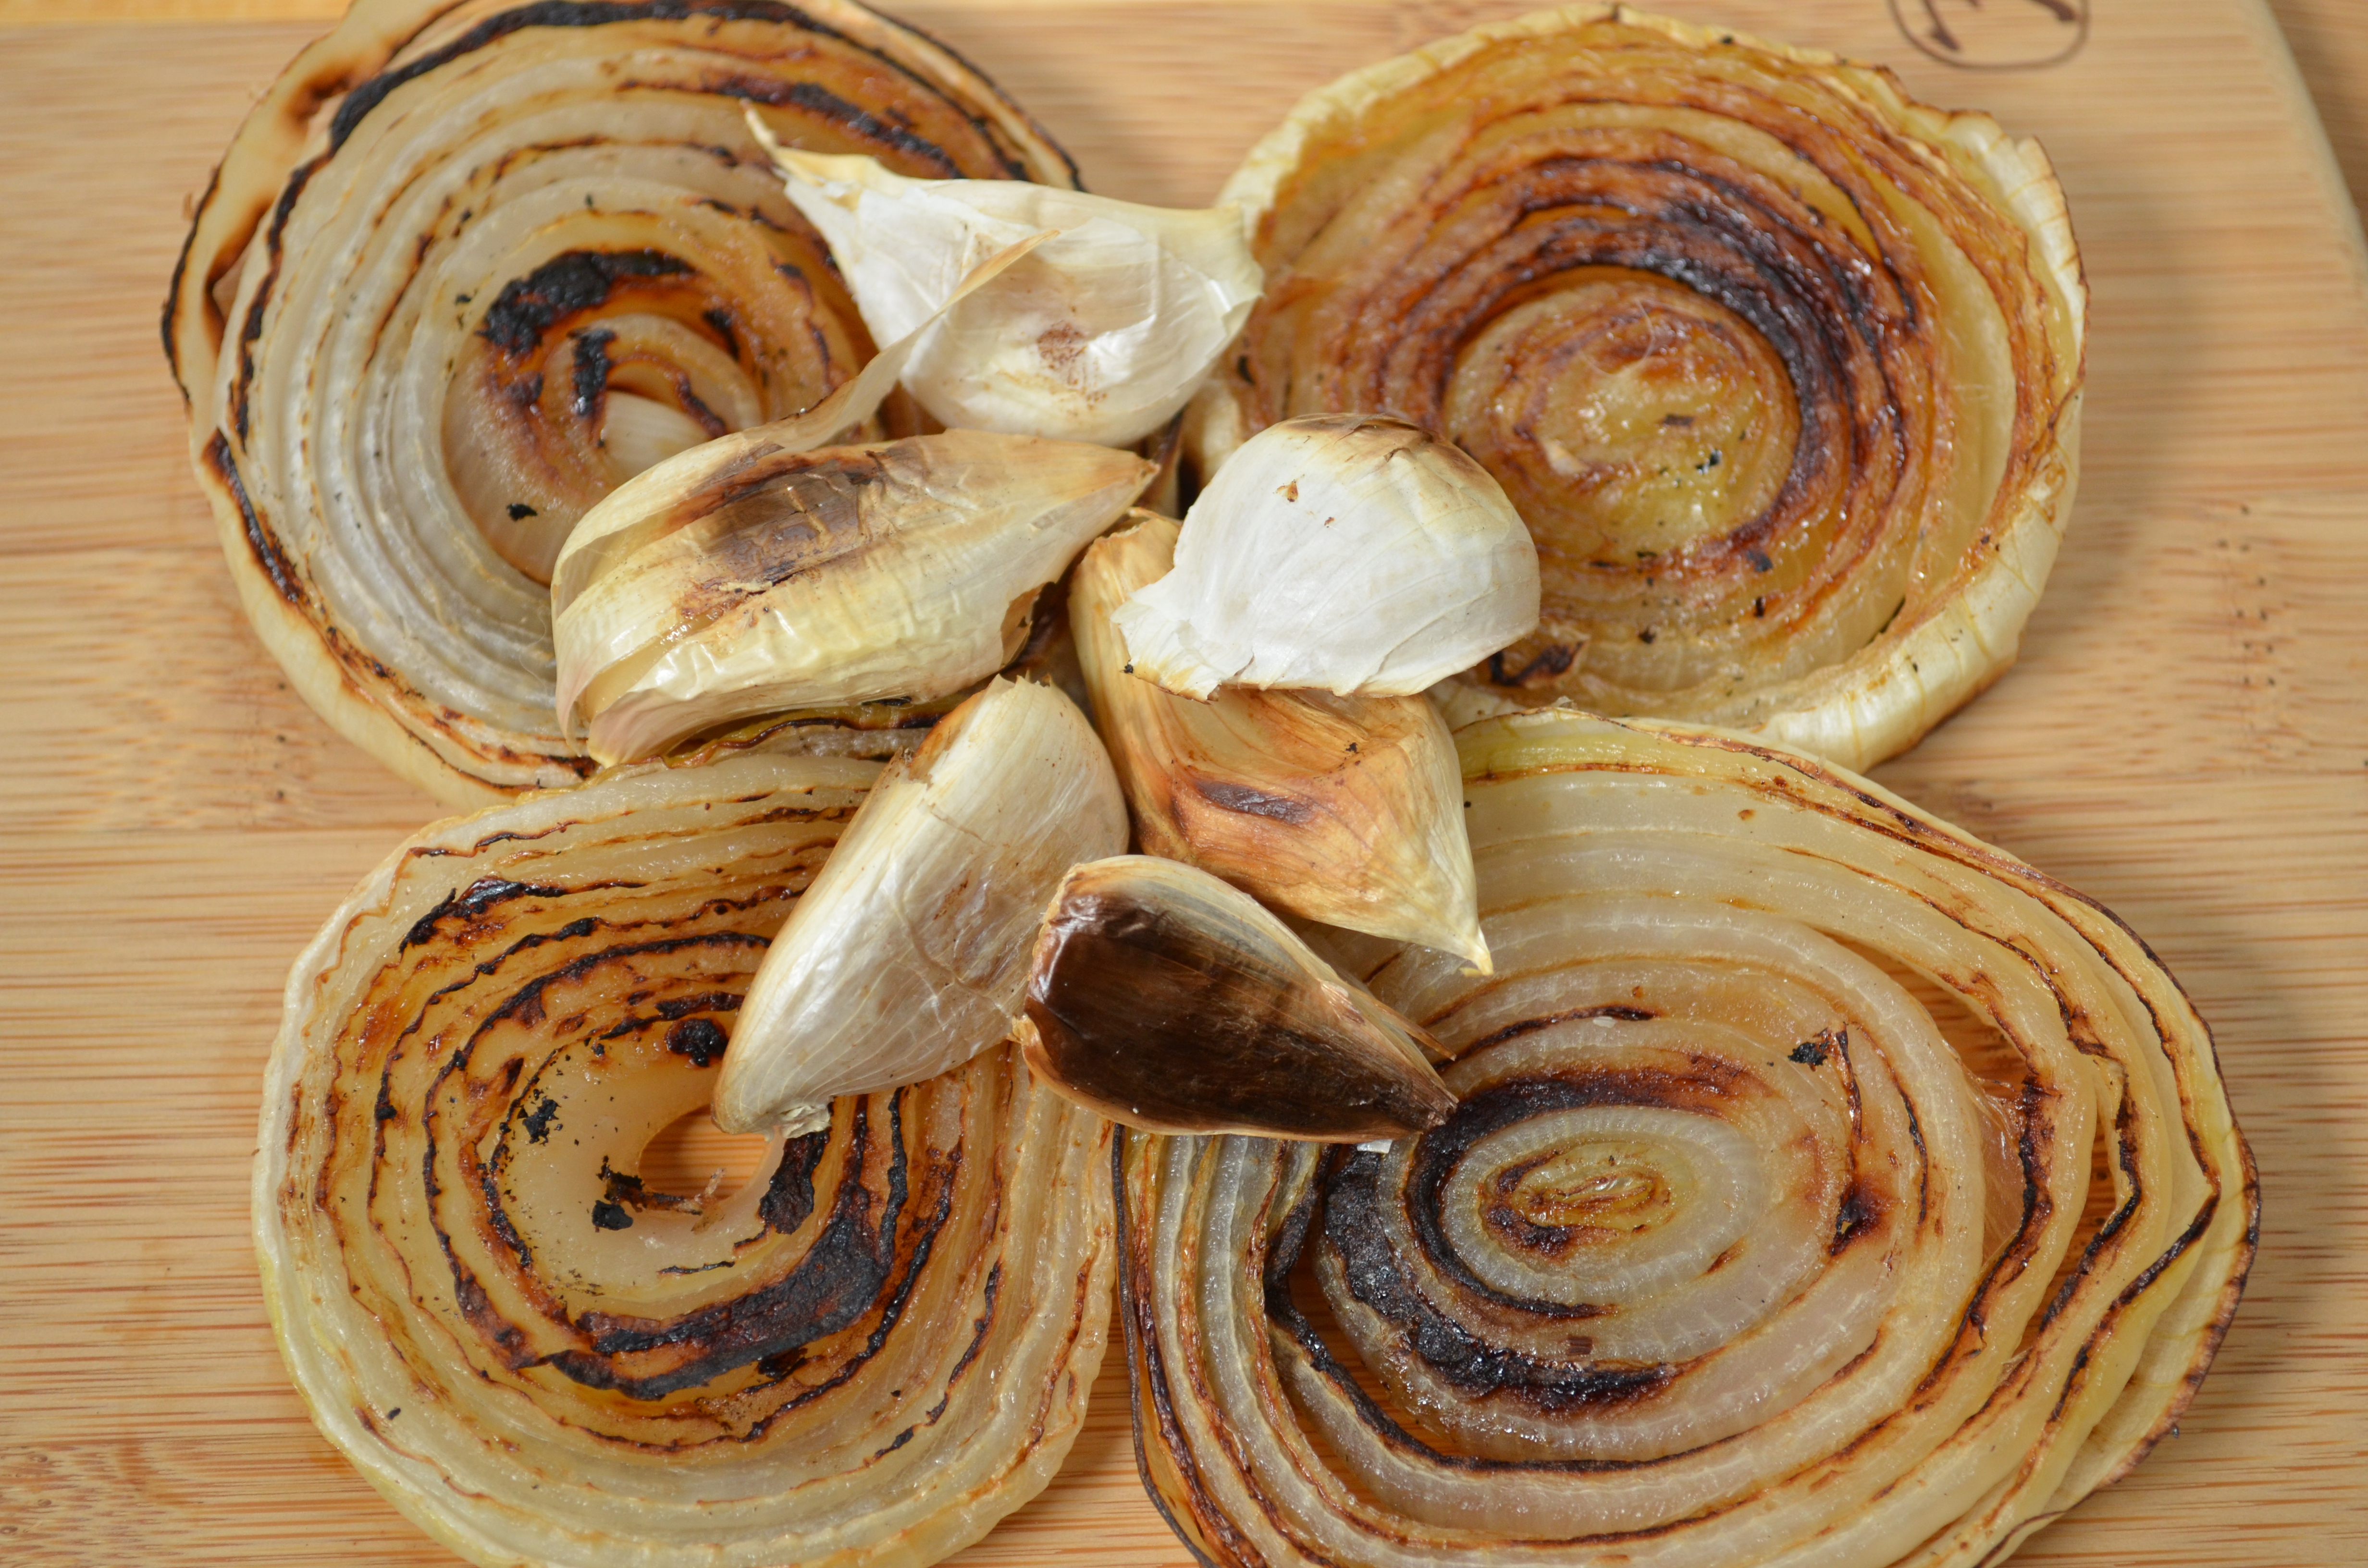
For the side condiments I made Thai style pickled baby carrots, Mexican pickled red onion, and fresh sliced small red radishes. In case you were wondering, those are fresh arbol peppers on the cilantro at the very top of the 1st photo. Those are traditional flour tortillas and turmeric, cilantro and chilli flavored flour tortillas. I was all over the map today.

Finding fresh nopalitos in your area might be a problem for you. They are sold with the spine still on or cleaned and packaged in plastic bags either diced or whole. If not, look in the “Latin American” aisle for nopalitos diced and brined in bottles. Though not as good as fresh cactus, they are not bad at all. You may decide to wash off the brine before using. I use them if I don’t have time to prepare fresh cactus pads. Cleaned cactus will last just a few days in the refrigerator before they start to turn brown and slimy at the scraped off parts and edges.

Hijole! Handle with care!


This recipe will feed 2 or 1 with good leftovers for later. I have to admit the quantities for each ingredient are a rough estimate. Adjust to suit your taste.
Use your favorite curry spice blend.
If you don’t have a wok, substitute with a large non-stick pan.
I like using brown rice, but any long grain white rice will do. The rice in these photos is long grain white. I rinsed the raw rice in several washings to remove some starch. This helps prevent it from sticking together during cooking.
For 2 people:
2-3 tablespoons vegetable oil (or other mild oil with a high smoking point)
2-3 tablespoons diced onion
3 medium size cloves garlic minced
2 tablespoons curry spice mix
3 tomatoes, juice squeezed out, and diced
3 nopalitos pads (or a 8 to 10 ounces bottled cactus)
about 3 cups long grain cooked rice (previously refrigerated)
About 1/2 cup chopped fresh cilantro
Salt to taste
To prepare nopalitos: Be very careful with spiny cactus. I recommend using protective gloves when handling. Trim off the outer edge with a knife, then carefully scrape off the spines. No need to dig them out, just kind of slice them off. Dice the nopalitos into 1/4 inch by 1 inch pieces. Our local international grocery store often has 1 or 2 “representatives” scraping off the spines in a small display stand encouraging the customers to buy fresh cactus which was imported from farms in Mexico. It’s amazing to watch them deftly clean a pad in a matter of seconds. They all seem to be very adept at it. A slower worker would probably not be tolerated in that situation. Put your diced cactus in a pot with about 2 quarts of water. Add a heaping teaspoon of salt and bring to a boil. Some cooks add a 1/4 teaspoon baking powder to help maintain a greener color. I’m not sure it makes a difference. Keep them at a good rolling simmer for about 15-20 minutes. Besides tenderizing and cooking, this will remove the mucilegeous part of the cactus. After the simmering, they should be crisp yet tender. Drain from the pot when done and set aside.
Many of you must surely have your personal rice stir fry method which you can adapt to here. I start with moderately heated oil to fry the onion and garlic so as not to burn them. Add the curry spice blend and stir fry briefly. Push the ingredients to the side of the wok or remove them while leaving the oil if things start getting to the burning point. The idea is to flavor the oil. Turn up the heat to high and get your wok or pan vey hot. Add the nopalitos and stir fry for a couple of minutes. Add the tomato and stir fry briefly. Return the onion and garlic if you had removed them. Add your rice and fry for a bit keeping things constantly stirring around to blend all the flavor together. Add the fresh cilantro and incorporate. Season with salt to taste. Serve immediately.

You may need to add a little more oil during the stir frying process.


I hope you can try this someday!
Tortillas “De la India”

Thank you very much to those of you who have visited Chicano artist Roberto Gonzalez’ website! My interview with him is in the works and will be posted here at “Bread and Tortillas.” If you haven’t yet had a chance to explore his site, please do so at http://www.robertojosegonzalez.com/ He greatly appreciates the visits!
These delicious and unusual tortillas with the whimsical title are a kind of prelude to what’s to follow, which is a recipe involving a wok, a very rustic Mexican ingredient, and one of Sonal’s fabulous spice mixes, a curry masala. Her wonderful blog is at http://simplyvegetarian777.com/ I had to do justice to the masterful blend of Indian spices she so generously took time to send me. These tortillas are designed to accompany the dish I came up with using her mix.
What I can tell from looking at recipes and photos, chapatis are the Indian flatbread which most resemble the Mexican tortilla. At their most simple and basic they involve atta, oil or ghee (optional), salt, and water. Atta is an Indian style whole wheat flour which give chapatis their particular taste and texture. The dough is portioned and rolled out to a flat thin round shape then cooked on a special griddle. This sounds like a very close relative to the tortilla.
Some of you might remember my cilantro and serrano pepper tortillas from a while back. I removed the serrano peppers and added turmeric and ground toasted red chillis to the recipe for a taste that might remind one of India. The dried red chillis, which I found to be very flavorful, moderate to high in heat, and slightly sweet, are a product of India. They are a distinct variety from the Mexican ones I’m familiar with. The one teaspoon of turmeric is just enough to give a nice color and slight flavor to the tortilla. I tried to imagine other Indian spices in the recipe, but ultimately decided on keeping it simple . Using fenugreek leaves instead of cilantro sounded intriguing but where was I going to find fresh fenugreek?
I also made a batch using a 50-50 mix of all-purpose flour and sifted whole wheat flour. I used 2 tablespoons of a neutral flavored oil, grapeseed, instead of vegetable shortening. This was a dough I believed to be closer to what a chapati would resemble. It turned out tasty and much healthier, I just preferred the flavor of the 100% all-purpose recipe. I found out that atta is a lighter textured and sweeter tasting whole wheat flour than ours because of the milling process. I need to visit our specialty market soon!
For 10 tortillas:
2 cups all-purpose flour
1/4 cup vegetable shortening
1 teaspoon ground turmeric
1 1/2 teaspoons toasted and ground dried red chillis (3 Indian chillis)
3/4 to 1 cup loosely packed chopped cilantro
1 good full teaspoon salt
about 3/4 cup warm water
A couple of twists of black pepper from a pepper mill would be a nice addition to the recipe. (See Roberto’s comment below). Oil could also be substituted for the vegetable shortening. though you will likely have to adjust the amount of water. Start with less than 3/4 cup water.
Place the flour and shortening in a mixing bowl. Using your fingertips, work the shortening into the flour until thoroughly blended. Mix in the turmeric, ground chillis, and salt. Next add the cilantro and mix in well. Pour in the water and blend well to make a loose dough. Put it on your work station and begin kneading. Go at it for about 4 to 5 minutes or until it becomes smooth. We are not looking for elasticity, just smoothness. Add water or flour as needed to make a dough that is neither wet or dry. Experience is the best teacher. Divide the dough into 10 portions and form each into a round. Cover with plastic and let rest for 30 to 45 minutes.

Get your griddle, comal, heavy pan, or iron skillet hot over medium heat. Take one of the rested portions and roll out with your rolling pin to about 6 inches in diameter. Place it on the hot comal. A few bubbles will probably begin to form. Turn it over after about 45 seconds to a minute. There should a few brown spots. Turn it over once more after a minute or so and let cook another 30 seconds or so. Just make sure it’s not overdone. You know what a tortilla looks like! A lot will depend on how hot the comal is and how moist the tortilla dough is.

This is a flatbread with an identity crisis! Or maybe it’s comfortable in 2 worlds. More likely it’s somewhere in between. The title, by the way, in case you missed it, is a kind of play on words, “Tortillas ‘from India'” or “Tortillas ‘from the Mexican native Indian woman.'”

I bet this would go nicely with Mexican or curried lentils. However…
Next up on the prep table will be my recipe using Sonal’s curry masala!
Roberto Gonzalez: Sacred Waters
Hello/Hola dear friends and readers. I’m writing this quick post to highly recommend to you the art exhibit, Roberto Gonzalez: Sacred Waters, at the “Centro de Artes” in the heart of downtown San Antonio. Roberto is a highly esteemed artist and great friend of mine I’ve had the pleasure of knowing for many years. It gave me great joy to find out he was exhibiting at “Centro de Artes”, and more so because his work is up during Fiesta Week San Antonio during which the city receives thousands of people from around the state of Texas and the U.S. If you plan to be in the city, give the museum a visit. If you are an out-of-towner going to Fiesta Week, the museum is conveniently located in the middle of it all by the Mercado (Market Square). If you are interested in contemporary and timeless Xicano art, go see his magnificent work.
I spent a memorable afternoon visiting with Roberto as he gave me a personal tour of his paintings. What an honor! The personal imagery and vibrancy of his work stayed with me as we left the museum to find lunch. From the evocative and meditative ambience of the museum we stepped into the bustling and dynamic atmosphere that is the city of San Antonio. It was preparing for its biggest city wide cultural celebration, which was only a few days away. We eventually found a couple of spots to sit and chat to catch up on what we’ve been up to in our lives lately. I always get a sense of peace and well-being from him as we talk. I had more questions to ask about his work and philosophy. I thought it would be interesting to share his ideas and reflections about his art through “Bread and Tortillas”. He was his usual gracious and generous self as he shared some insights into his work. Through the coming weeks I’ll be posting the interview in parts. Stay tuned!
His website can be found at http://www.robertojosegonzalez.com/ You’ll find that he is also a performance artist, composer, and musician.
“Centro de Artes” is located right on the Market Square at: 101 S. Santa Rosa Avenue 210-784-1105 It is open Tuesday-Sunday 10 AM to 5 PM.
His exhibit will be up through June 19.


From his “Artist Statement”:
“The Xicano artist works as an agent to restore our cultural spirit before all is lost, before we all become the same. Being a Xicano artist is and has always been a searching reflex. The search is for cultural attachments. The separation and loss of connection to Madre Mexico has been profound historically. It forced Xicanos to have the need for developing a new selfhood.”
“My path as an artist is a practice of the following. Being, secure attachment to self, natural state, conscious integration, mindful bonding, creative and spiritual transformation, enlightenment, liberation, and oneness. All of this is in support of my reverie in the studio when I begin work and in the very real sacred space of the creative moment. It is a grace of oneness in creation, soma in bliss. Who I am becoming, is who I am as an artist.”
Sourdough Baguettes w/Chipotle Chile

If I happened to be in Paris during the city’s baguette competition, I’d make sure to go and see all the excitement and commotion. Or is it more of a laid back affair? There are probably hundreds of entries, can anyone really get worked up over thinking they have the best chance to win? There are strict rules to follow if you’re competing in the “Grand Prix de la Baquette de la Ville de Paris”. Your baguette must be 55-65 centimeters long and 250-300 grams in weight. It’s judged on appearance, cooking, texture, smell, and taste. The crust should be crisp, while the crumb should be elastic with irregularly sized and unevenly spaced holes. Dark crusts and 5 slashes are the norm. It must be made with only flour, water, yeast, and salt. I make French style baguettes as often as I can at my restaurant job to serve crostinis, bruschetta, special sandwiches or whatever other excuse I can come up with to make them. It’s a type of bread I have to make on a semi-regular basis just to stay in practice. Proper shaping is kind of a tricky thing. It took me more than a few tries and fails before I started to get some kind of handle on it. Sooner or later I will post a recipe because it is one of my favorite breads to make. My baguette today is world’s away from the French type. For one, it’s leavened with sourdough. Then, besides bread flour, it has ground chipotle chile, some whole wheat flour, a bit of rye flour, and agave syrup in it’s ingredients. “Baguette”, which means “wand” or “baton” refers only to the shape of this bread, not the texture, flavor, size etc. I wanted a flavored bread that could sub(really, no pun intended) for the telera or bolillos, the traditional white flour rolls used for making tortas, the iconic Mexican sandwiches. I’ve made chipotle flavored sourdough loaves before, but sliced bread doesn’t work very well for making tortas. A baguette, a flavorful spicy one at that, however, is a good stand-in.
The main challenge I encountered along the way was managing this very wet and sticky dough. Lightly flouring my work surface and sometimes the dough itself was very helpful. After dividing the dough and letting the pieces rest for 1/2 hour, I formed them into rectangles 3/4 to 1 inch thick (about 2 centimeters). I folded them up as if folding a letter then shaped them into a “batard” form. I then rolled them into “batons” by rocking them back and forth and gently pulling the ends as well to get them to the right width and length. I made them as long as my baking stone allowed. Of course they had to proof in a couche.
I didn’t want to have a fully developed sourdough bread flavor and texture. I doubled the usual amount of levain I usually use and cut back on the amount of flour. I have noticed that the crumb comes out lighter and softer when I make those adjustmenst, 2 qualities I was looking for in the bread.

Levain:
15 grams sourdough starter refreshed 8 hours before (1 Tablespoon)
200 grams water at 78 degrees F.
200 grams bread flour
Final Dough:
All the levain
500 grams water 80 degrees F.
45 grams agave syrup
600 grams bread flour
150 grams whole wheat flour
50 grams rye flour
2 Tablespoons ground chipotle chile
20 grams salt plus 50 grams water
- I made the levain the night before baking. It was ready in about 8 hours.
- The next morning I dissolved the levain and agave syrup into the 500 grams water.
- I stirred together the 3 flours and ground chipotle pepper and mixed them into the levain water mixture, making sure everything was well moistened.
- I let the dough autolyze for 45 minutes to an hour.
- I mixed the salt into the 50 grams water and then squeezed it into the dough, making sure it was evenly dispersed.
- Bulk fermentation lasted 3 1/2 hours.
- I shaped them as I described above for a proof of 4 1/2 hours.
- I scored them and baked 3 at a time in a 475 degree oven for about 15 minutes per batch. After 7 to 8 minutes I lowered the temperature to 430 degrees. During the first 7 or 8 minutes I misted the oven 3 times with water.
- After they were done, I let them cool on a rack.

There is no way around using a couche.


Spelt Sourdough Bread w/Mixed Seeds

One of the nice things about the blogging world is that you get to see what other bakers and cooks are doing and thinking about foods. For a self-taught bread maker like myself, it is an invaluable window into the baking world of those who share similar experiences. It’s even better when you can share some humor while you’re at it. You’ll see what I’m talking about if you check out Angie’s Fiesta Friday.
The last several weeks have found me trying out spelt flour in sourdough bread and tortillas. I had used it a couple of times before in regular bread but appreciated it’s flavor and qualities much more when I recently made 100% spelt flour tortillas as well as this sourdough bread. It has won me over as a flour to keep in my kitchen. Today I’m presenting a take on spelt sourdough with 3 kinds of seeds. By coincidence Elaine and Ginger were also baking versions of sourdough bread with spelt flour in the ingredients. Their delicious looking loaves are more complex in flavor with their use of rye berries, oats, and seeds. It’s always very interesting to read as they generously share how they approach their breads. They are two who take baking and cooking very seriously… Meanwhile, I was taking a less complex route!
To get a better feel for using spelt I kept it simple and used a minimum of ingredients. There are equal amounts of bread, spelt, and whole spelt flour. I wanted to make sure I would get some decent gluten action. When I make sourdough bread, I usually aim for a loaf with alveoli big enough to drive a truck through. What I understand about spelt is that it is somewhat comparable to whole wheat flour in the amount of gluten it can develop. So you bet I’m going to go for a high hydration percentage, 70.5% in this case. I also thought about what effect the seeds might have on the developing gluten. I read somewhere that even some of the ground components in whole wheat flour can cut gluten that’s trying to build up as you knead. Who knows to what extent that’s true. Perhaps if you knead for a long time it would make a significant difference. However, I have noticed in several recipes I’ve come across that nuts or seeds are not added until the middle or end of kneading. None explained the reason for delaying the addition of these extra ingredients. It occurred to me that seeds or nuts would interfere with the dough and perhaps even cut some “strands” no matter how carefully it is stretched and folded. So this dough had been proofing at least an hour before I carefully folded in the seeds. This I believe, would give the dough some time to develop and strengthen.
This is a very wet and sticky dough that requires some deft handling in case you’re not used to it. As the portions rested for the 1/2 hour before shaping, they flattened out to the form of a thick pancake. Even at the end when I placed the finished dough in the oven, they flatten out on the baking stone. As I misted them with water during the first 10 minutes of baking I could see them magically began their oven spring.

I underestimated the gluten potential in spelt. The holes came out larger than I expected. The flavor and texture turned out very nice too. Spelt flour adds a “sweet”flavor to the bread and has very little if any of the bitter taste you find in whole wheat flour. The toasted seeds added a nice nuttiness and bite.
I’ll just give a summery of the process with key points. If you want more details, let me know, I’ll be happy to further elaborate.
For two medium size loaves:
Levain:
1/2 to 3/4 Tablespoon starter (refreshed 8 to 9 hours before)
100 grams water
100 grams bread flour
Final Dough:
All the levain
600 grams water 80 degrees F.
300 grams bread flour
300 grams spelt flour
300 grams whole spelt flour
20 grams salt mixed with 35 grams water
150 grams mixed toasted seeds (I used 50-55 grams each of sesame, sunflower, and pumpkin seeds)
- I made the levain the night before. It was ready to use in about 10 hours in my 75 degree F. kitchen.
- The pumpkin and sunflower seeds were toasted in the oven. The sesame seeds were pan toasted over a stove.
- The levain was dispersed in the 600 grams water and the flours were mixed together then added to the water/levain. All the flour was evenly moistened. Autolyse lasted 1 hour.
- The salt and 35 grams water was mixed together, then squeezed into the dough. I then covered the dough and gave 6 turns over 3 1/2 hours. I added the seeds during the turning phase after about 1 hour.
- I took it out of the bowl and divided it into 2 portions. Each was formed into a ball, covered and allowed to rest about 30 minutes.
- I shaped them, then placed them in bannetons.
- Final proofing lasted 5 hours.
- They baked in an oven pre-heated to 500 degrees. I lowered the temp to 420 after 10 minutes. During the first 10 minutes I also misted the oven several times with water to mimic a steam-injected oven.
- They baked in about 15-20 minutes. I let them cool completely before slicing.

Here are the baker’s percentages if you’re interested.
Final dough
Bread flour 33.3%
Spelt flour 33.3%
Whole spelt flour 33.3%
Levain 24%
Water 70.5%
Salt 2%
Seeds 16.6 %
Levain
Bread flour 100%
Water 100%
Starter 14%


Tortillas de Quelites

I hope everyone of you is having a great holiday season and a good New Year! I wish you all profound peace for the upcoming year. I think we can always use a bit more of it.
I should go over the nomenclature of the main extra ingredient for these tortillas. I saw them in Diana Kennedy’s beautiful and massive “Oaxaca al Gusto, an Infinite Gastronomy”, a cookbook dedicated to 11 distinct regions of that southern state in Mexico. This is not the post to get into the book but I’ll just mention it is gorgeous, with many beautiful photos of foods and dishes which can only be found in that region’s remote corners. “Tortillas de Quintonil” which she translates as “Tortillas of Wild Greens” is the recipe I found in the book. In another one of hers, “From My Mexican Kitchen”, she writes that quintoniles include several species from the amaranth family and fall under the umbrella of quelites or wild greens. For Rick Bayless, quelites are more specifically what is known as lamb’s quarters. Marilyn Tausend in “Cocina De La Familia”, also refers to quelites as lamb’s quarters. So you dear readers who are forager’s and/or gardener’s, I include a photo of the green so that you can comment on the identification of it. I appreciate any clarification. In Mexican cooking they are primarily used as a light stew with perhaps onion and garlic, as taco filling, or as an ingredient added to pinto beans. This is the only time I’ve seen them as an ingredient in the masa for corn tortillas. These greens are readily available year round in one of our supermarkets alongside verdolagas, huauzontles, epazote, yerbabueana, berro, other greens or herbs used in Mexican cuisine. We are fortunate to have them. I’m also keeping a good eye out for wild quelites, since they seem to grow wild in many parts of the U.S and Mexico.

According to Kennedy, quelites are used especially during the rainy season to help in times when corn is running low, thus stretching the stock of maize for a longer time. They add a green earthiness to the tortillas which I enjoy. My cilantro flour tortillas came to mind when I made them, but these have a different flavor altogether. They are very tasty and unusual, good for making tacos, quesadillas, or just eaten alone with salsa. They will surely attract curiosity if you present them on your next Mexican buffet.
Kennedy uses fresh corn masa but I opted for masa harina, which means an addition of water is necessary. The quelites provide some moisture so I watched carefully as I added the water. Cooking the greens with a bit of onion and garlic before adding them to the masa makes them more flavorful.
This recipe is an adaptation of hers. She also suggests using other types of edible greens or spinach.
This will make 9 to 10 tortillas:
3 good bunches of quelites ( it will render about 1 cup after cooking down)( each of the bunches weighed about 1/4 #)
about 1 heaping tablespoon chopped onion
2 medium garlic cloves chopped
2 tablespoon oil
1 cup masa harina
1/2 cup water
3/4 teaspoon salt
To be more specific, you need about 6-8 ounces of leaves only. The stems are too tough to use. Remove the leaves from the stems and thoroughy wash them to remove the dirt. Drain them. Get about 2 quarts of slightly salted water to boil in a pot. Add the greens and cook until just tender, about 2-3 minutes. Drain them and run cool water over them. When cool enough to handle, squeeze as much water as you can from them.
Heat a frying or saute pan to medium heat and add the oil, I used grapeseed, but olive oil, vegetable, or other kinds of mild flavored should do ok. Saute the onion for a minute, then add the garlic. Don’t let them burn. Finally add the quelites and fry just lightly for a minute or two. Add more oil if necessary. Remove from the heat and let them cool down. Next, finely chop the green mixture.
In a mixing bowl, put the masa harina, salt, and chopped quelites mixture and blend well together. Add most of the 1/2 cup of water and incorporate. Add more water as needed to make a moist dough. It should be neither too moist or too dry. One way I check is by squeezing a small portion between my thumb and index finger. It should not be too dry that it cracks at the edges.

Divide the masa into 9 or 10 portions and form each into a ball. I let them rest for a few minutes. Keep them covered with a moist towel. They tend to quickly dry out. Get your trusty tortilla press and a piece of plastic wrap. Cut the plastic into two pieces that are each just big enough to cover the plate of your tortilla press.

You might have one of these or the metal type of tortilladora. If not, you can get away with using a rolling pin to shape your tortillas. If you can do it by using your two hands, I’ll be quite impressed.
Get your comal or heavy skillet pre-heated over your stove to medium hotness.
Place one of the pieces of plastic on the plate of the press and put one of the masa balls on top.

Put the other piece of plastic on top. Then press. You may have to rotate the dough once to get a nice circle.

Remove the top plastic

Place the dough and bottom plastic on your weak hand.

Carefully flip it over onto your strong hand and remove the remaining plastic.

It’s ready to flip over onto your hot comal.
The tortilla should give a slight sizzle when you place it on the comal. Cook the tortilla for about a minute to 90 seconds, then flip it over. After another minute or two turn it over again and let it cook maybe another minute. If your tortillas are sticking, they are too moist. If they crack and harden, they are either too dry, or the comal is too hot. You’ll get the hang of getting the dough the right consistency and the skillet to just the right hotness with practice.
When they are done, they may have a few nice brown spots. They should be nice and flexible and not crack when rolled or folded. Keep them covered with a kitchen cloth. So far they’ve kept well after a day when kept in the refrigerator. They just need to be heated up to get their flexibility back.


They tend to be a little thicker than regular corn tortillas, but they are still quite soft and flexible. Just keep them covered.

I made some mouthwatering quesadillas with some of the dough.

Pureed butternut squash flavored with ancho chile powder and epazote for one, and refried beans and epazote for another.

Or the butternut squash and ancho powder puree with cilantro and mild red pepper.

That’s a stripe of New Mexican chile tomato salsa there. Many different types of salsa go well with these.
I know I’m very late but I’m sending these tortillas over to Angie’s Fiesta Friday to help celebrate the 100th edition of her fabulous party where you’ll find insanely talented cooks, gardeners, storytellers, and more presenting their incredible creations. It is quite a feat to have kept it going strong for so long. She also has her many friends who have assisted with the work it takes to keep such a labor of love going. Congratulations Angie!
Roasted Tomato Salsa w/3 Chiles

What kind of salsas do you more often make at home? There are many types to choose from for different uses aren’t there? Within each type there are many variations to try out or create. Much depends on what is available to you in your stores and markets though I guess just about anything is available online these days. A wider variety have become more readily available in recent years in my area. Do you make salsa as dips for tostadas or are they used for topping your main or side dishes? The kind I seem to be making the most of lately are the roasted tomato or tomatillo variety. It’s for the simple fact that I have all these dried chiles that need to be used up. Chipotle, guajillo, arbol, Anchos, New Mexican are very often the key chile ingredient. They seem to make for the more classic roasted tomato/tomatillo salsas. Because of their particular flavor and/or heat level they can stand alone to suit individual tastes as the sole chile in the recipe. Some dried chiles are not as popular as a stand alone chile in salsas. Which brings me to the mulato chile. It is used indispensibly in many mole recipes for its deep dark color and sweet, almost chocolaty flavor. How does it hold up in a salsa? I started by pureeing roasted tomatoes, onion, and garlic, then began adding the toasted mulato chiles. Although it gave an interesting flavor, it was too muted and needed some balancing out. I added arbol chiles for a brightness, a bit of nuttiness, and heat. Something was still missing so I reached for pasillas, which have fruity notes to them. My next choice would have been guajillos for their lighter flavor but I was completely out of them. The result in any case, was a much more balanced flavor with each chile adding its own qualities. It still needed some brightening up so I added apple cider vinegar. A mere teaspoon really enhanced the flavor. This turned out to be a very tasty salsa with a unique flavor profile. I dipped fried tortilla chips, topped some lentils, tried it on some tacos, and also dabbed it on quesadillas. It was hard to ignore this one.
There are many possibilities to play with in making this type of salsa. We also have the choice of using tomato or tomatillo, or both. Do I want to roast the garlic or leave it raw? Do I roast or saute the onions? Does it need the acidity of lime juice or vinegar. How about adding oregano, cilantro, or thyme. Some combinations don’t work, but many will. Why always settle for the tried and true when you can come up with something uniquely yours.

Left to right are pasilla, arbol, and mulato peppers.
This recipe makes about 1 quart
12 Roma tomatoes
1/2 medium onion
5 unpeeled garlic cloves
2 mulato chiles
7 arbol chiles
2 pasilla chiles
1 tsp. apple cider vinegar
Water as needed to adjust consistency
salt to taste
First I broiled the tomatoes until they began to char a bit. I turned them over to slightly char the skin on both sides. I was carefull not to broil them to a mushy state. As they were going I put my comal (iron skillet) on low-medium heat. The onion was sliced and pan roasted on a heavy skillet until softened and slightly blackened. The garlic was also added to the pan and cooked until softened. In another heavy pan, the chiles were toasted. Set the pan to medium-high heat. Remove the seeds from the chiles and one by one press them on both sides on the hot skillet with a metal spatula for a few seconds. You may notice a slight change in color. It will release a nice aroma. Do not burn or it will turn bitter. Immediately remove the chile and continue with the rest. I left many of the chile de arbol seeds in the chile to give more spiciness to the salsa.


When the tomatoes, onions and garlic had cooled down, I peeled the garlic and put everything in the blender to puree. I then added 2 mulato chiles to the blender and after tasting the result, decided that was good on that kind of chile. Next in were the arbol peppers. That would give enough heat and a subtle nuttiness. The pasillas were then added to give more balance. I tasted it after one, then added another. The apple cider vinegar did its trick next. I added a bit of water to adjust the consistency. Roma tomatoes have less juice in them than most other kinds of tomatoes. I finally seasoned with salt to taste.

The salsa paired well with refried lentil quesadillas (vegan). The tortilla is home made with corn masa.

This is one I’ll make again. I’d also like to try substituting guajillos for the pasillas or mulatos.
Mesquite flour sourdough bread w/raisins

Be sure to visit Angie’s fabuloso Fiesta Friday where I’ll be taking this bread. There you can find out about Selma’s posthumous award she received from U.K.’s “Observer Food Monthly” at their annual ceremony. Prestigious indeed! Way to go Selma, you continue to touch our hearts!
Before I begin I also wanted to mention an update with an added introduction to my “Hatch Chile Salsa Verde”. Emily, the author of the wonderful blog “Cooking For Kishore” suggested to me to submit it to her fun series, “Food ‘n Film”. The October 2015 edition is still open. Do give her a visit!
I had a hard time trying to think of a good name for my blog when I started. I would have been very happy with “The Cosmic Tortilla”, my first choice, but a French band had already taken that up. “Bread and Tortillas” sounds so unimaginative but there was a simple reason behind the name. The idea was that those two meal accompaniments could be found on our table depending on what was being served. Tortillas for Mexican food, bread for about everything else. This was a time when tortillas were considered way too ethnic for mainstream U.S. of A. I don’t remember how long ago it was, maybe 20 or 25 years ago when I saw a TV commercial for “Mission Flour Tortillas”. The setting was a dining room of a middle to upper class white family. “What!?” I said to myself. “The tortilla has arrived!”, or maybe Mission was pushing it along. We don’t think twice anymore about the diversity of foods that are available to us. On the flip side, the bread we were eating as kids was not very ethnic at all. I could not imagine a TV commercial for say pumpernickel or sourdough or any kind of artisan bread. That would have also been too ethnic for the mainstream. Not including “pan de dulce” which we ate every Sunday at our table, our family had 2 kinds of bread on our shopping list. One was the plain old white sandwich bread, which was our multi-purpose accompaniment for all things “American” like sandwiches or toast. (Special occasions called for “Pan Frances”, which is found in Mexican bakeries.) Oh, and we used white sandwich bread to make “capirotada” (Mexican bread pudding). The second kind of “American” bread we enjoyed was raisin bread. Back in those days, those were the only types of non-Mexican bread available for us to buy in the little towns of the Rio Grande Valley of Texas. What kind of breads or tortillas did you eat growing up?


I can’t help but be reminded of the good old commercial raisin bread we were so fond of as kids when I bite into this mesquite sourdough. The small amount of mesquite flour gives it a different flavor, but the raisins and cinnamon are a natural fit for it. And voila, NO PERSERVATIVES, ADDITIVES, CONDITIONERS or anything else. It tastes much better than the stuff you find on your supermarket shelf. The soft crumb has a great chew though I think the dough could stand a little more water for an even moister crumb. It’s been many years since eating commercial raisin bread but I am willing to bet that in comparison to my loaf, it would now seem to crumble and almost dissipate in your mouth, rather than let you enjoy flavor to the fullest. Not that the flavor is all that great!
I made a version of this bread a couple of weeks ago and decided to add more cinnamon and a little less sugar this time around. It got eaten so fast though that I didn’t have a chance to take any photos. I take a lot of the blame for that. I better take my camera out before it’s too late.
I used a bread loaf pan and also made a boule from this recipe. I didn’t bother trying to make a swirl of raisins like you see with sandwich style loaves. I think it would have disturbed the tiny pockets of air that I carefully tried to nurture during the fermentation phase.

For 2 medium size loaves:
Levain:
1 tablespoon sourdough starter refreshed 8 hours before
200 grams water at 70 degrees F.
100 grams bread flour
100 grams whole wheat flour
Final dough:
All the levain
475 grams water at 78 degrees F.
525 grams bread flour
125 grams whole wheat flour
150 grams mesquite flour
50 grams granulated sugar
2 1/2 teaspoons ground cinnamon
12 grams table salt + 30 grams water
1 1/2 heaping cups raisins
Make the levain the night before:
I make this about 8 to 9 hours before I mix the final dough. Dissolve the starter in the 200 grams of water in a small bowl. Mix together the 2 flours and add it to the sourdough mixture. Blend everything well to make sure all the flour is moistened. Cover with plastic and let it ferment overnight at room temperature.
On the day of baking:
The next morning take a spoonful of the levain and drop it into a small bowl of water. It’s ready if it floats. It should be ok as long as it doesn’t smell vinegary.
Dissolve the levain in the 450 grams of water in a large bowl. In a separate bowl, mix the flours, sugar, and cinnamon. Add this to the levain/water solution and mix well to moisten all the flour. Cover with a wet plastic or a wet cloth and let it autolyze for 30 minutes or so. Next, dissolve the salt in the 30 grams water and then squelch this solution into the dough. Now add the raisins. It took me only a minute or two with the help of my 6 quart mixer but you can also do it by hand. Put the dough in a container for the bulk fermentation. I gave it a stretch and fold every 30 minutes for 3 hours. The dough became soft and supple with a slight increase of volume. It also tended to stick less and less to the container throughout the 3 hours.
Divide the dough into two portions and form them into rounds. Let them rest for about 10 minutes. Shape them to your desire. This dough is not so wet that it requires baskets or bannetons to proof but I liked using the loaf pan for one of the portions. Place the free standing loaf on parchment paper if not using a proofing basket. Lightly spray with baking spray oil and cover with plastic. I let these proof for about 4 1/2 hours. They had risen about 50%.
Preheat the oven to 500 degrees F. about 45 minutes before baking. If using loaf pans, place them in the oven and immediately lower the temperature to 425 degrees. Bake until the internal temperature of the bread reaches 200 degrees F. I scored the bread with a simple slash though I’m not sure it was necessary. If you shaped the dough into free standing boules, score them as desired and place in the hot oven. Do use your baking stone if you have one.I misted the oven with water 3 times within 10 minutes and then lowered the temperature to 425 degrees. I found that I had to cover the bread with foil about 15 minutes into baking to prevent the crust from getting too dark. Make sure you are rotating the bread every now and them to insure even baking. Remove when it reaches 200 degrees.
Put the bread on a rack and let them cool completely before slicing. It’s a test of patience to resist the temptation of cutting a warm slice of it right away.
Notes:
This bread has a higher ratio of levain than I usually use. I wanted to go for a quicker ferment and tighter crumb to mimic a loaf of raisin bread.
Mesquite flour has no gluten. That’s why I think it takes longer to rise despite the relatively high amount of levain in the dough.


Gorditas
Gorditas (“little fat ones”) are an absolutely delicious snack or meal which I enjoy making on a semi-regular basis. In case you’re not familiar with them, tortilla masa is the base of the dough, very much like corn tortillas, huaraches, sopes, etc. As the name suggests they are thicker and smaller in size. They are then stuffed with a wide variety of fillings, much as you would a taco. Gorditas are easier to shape and cook than tortillas so I wonder why they are not seen more often in restaurants. There are various recipes and methods of cooking which give slightly different textures and flavors. Some use masa alone, others may include all- purpose flour, shortening, or lard in the dough, others mix in cheese or mashed potato. I’ve also seen recipes with mashed black beans in the mix. I’ve got to try those out. Today I’m doing the masa and mashed potato version. I have come to especially like these since they remind me much of the gorditas I’ve eaten at the many street festivals that you find in San Antonio. I wish I could tell you what recipe the street vendors use, I ought to ask next time I get a chance. The gordita itself has a nice thin crispy exterior and tender inside which results from deep frying. Those made without potato tend to be a little denser in texture but it’s really just a matter of preference. Though they are made to be stuffed, I enjoy them as an accompaniment to meals as I would corn or flour tortillas.
For 8-10 gorditas:
2 cups masa harina
3/4 cup mashed potato (less than 1 medium size Russet)
2 teaspoon baking powder
1 1/4 teaspoons salt
1 1/2 cups water
Peel a medium size potato, cut it into 3 or 4 chunks and then boil until just tender. Remove from the water, put it in a small bowl and mash it. Use a ricer if you prefer, but the potato doesn’t have to be perfectly mashed. Let the potato cool.
Mix the masa harina, baking powder, and salt in a mixing bowl. Add 3/4 cup mashed potato and mix in well. Add most of the water to make a soft pliable dough. It shouldn’t be too wet or sticky. Cover the masa with plastic or a wet cloth and let it rest at least 30 minutes.
Heat a heavy skillet on medium and add enough oil to reach a depth of about 1/2 inch.
Take enough of your prepared dough to shape into a ball perhaps a little smaller than a golf ball. Using your hands, shape it into a disc about 2 1/2 inches in diameter and 1/2 inch thick. If the dough cracks too much on the edge, it is too dry. Add water as needed to adjust.

The oil should not be at the smoking point. Lower it if it is. Carefully put the gordita into the hot oil (tongs are recommended) and fry for approximately 1 1/2 minutes. You can put in 2 or 3 at a time depending on how big your skillet is. Carefully turn it over and fry an additional 1 1/2 minutes. Cook the gordita enough so that is a light golden brown. If it darkens quickly, lower the heat. The gordita should be crispy on the outside, but soft inside. Put them on paper or old kitchen towels to remove oil. Let them cool enough to handle and then use a knife to open your gordita as if opening pita bread. Stuff them with your desired filling. Add shredded lettuce, tomato, and salsa if you want. They should be served at once. It’s been suggested that gorditas can be kept warm covered in a very low heated oven though I haven’t tried that. Gorditas are usually eaten up pretty quickly.

The usual suspects as far as traditional options go are mostly meats as used in tacos. Sour cream and cheese are almost obligatory. If you are a vegan or even vegetarian, traditional choices are limited. Avocado, guacamole, refried pinto or black beans, potatoes, lettuce, tomato, onion, jalapeno, salsa, and nopalitos are the most obvious ingredients. It’s probably time to try some non-traditional ideas. How about including stuff like kale, pickled cabbage, steamed swiss chard, corn relish, or cucumber.
Smaller ones would make a great appetizer. Or you can serve them opened faced like a pizza. Just be sure to serve them hot.
I find gorditas to be a great option to keep in your Mexican/Tex-Mex food repertoire. They are a memorable treat for your family or guests.
I know it’s getting late, but I think I’ll head out to Angie’s Fiesta Friday and share these.

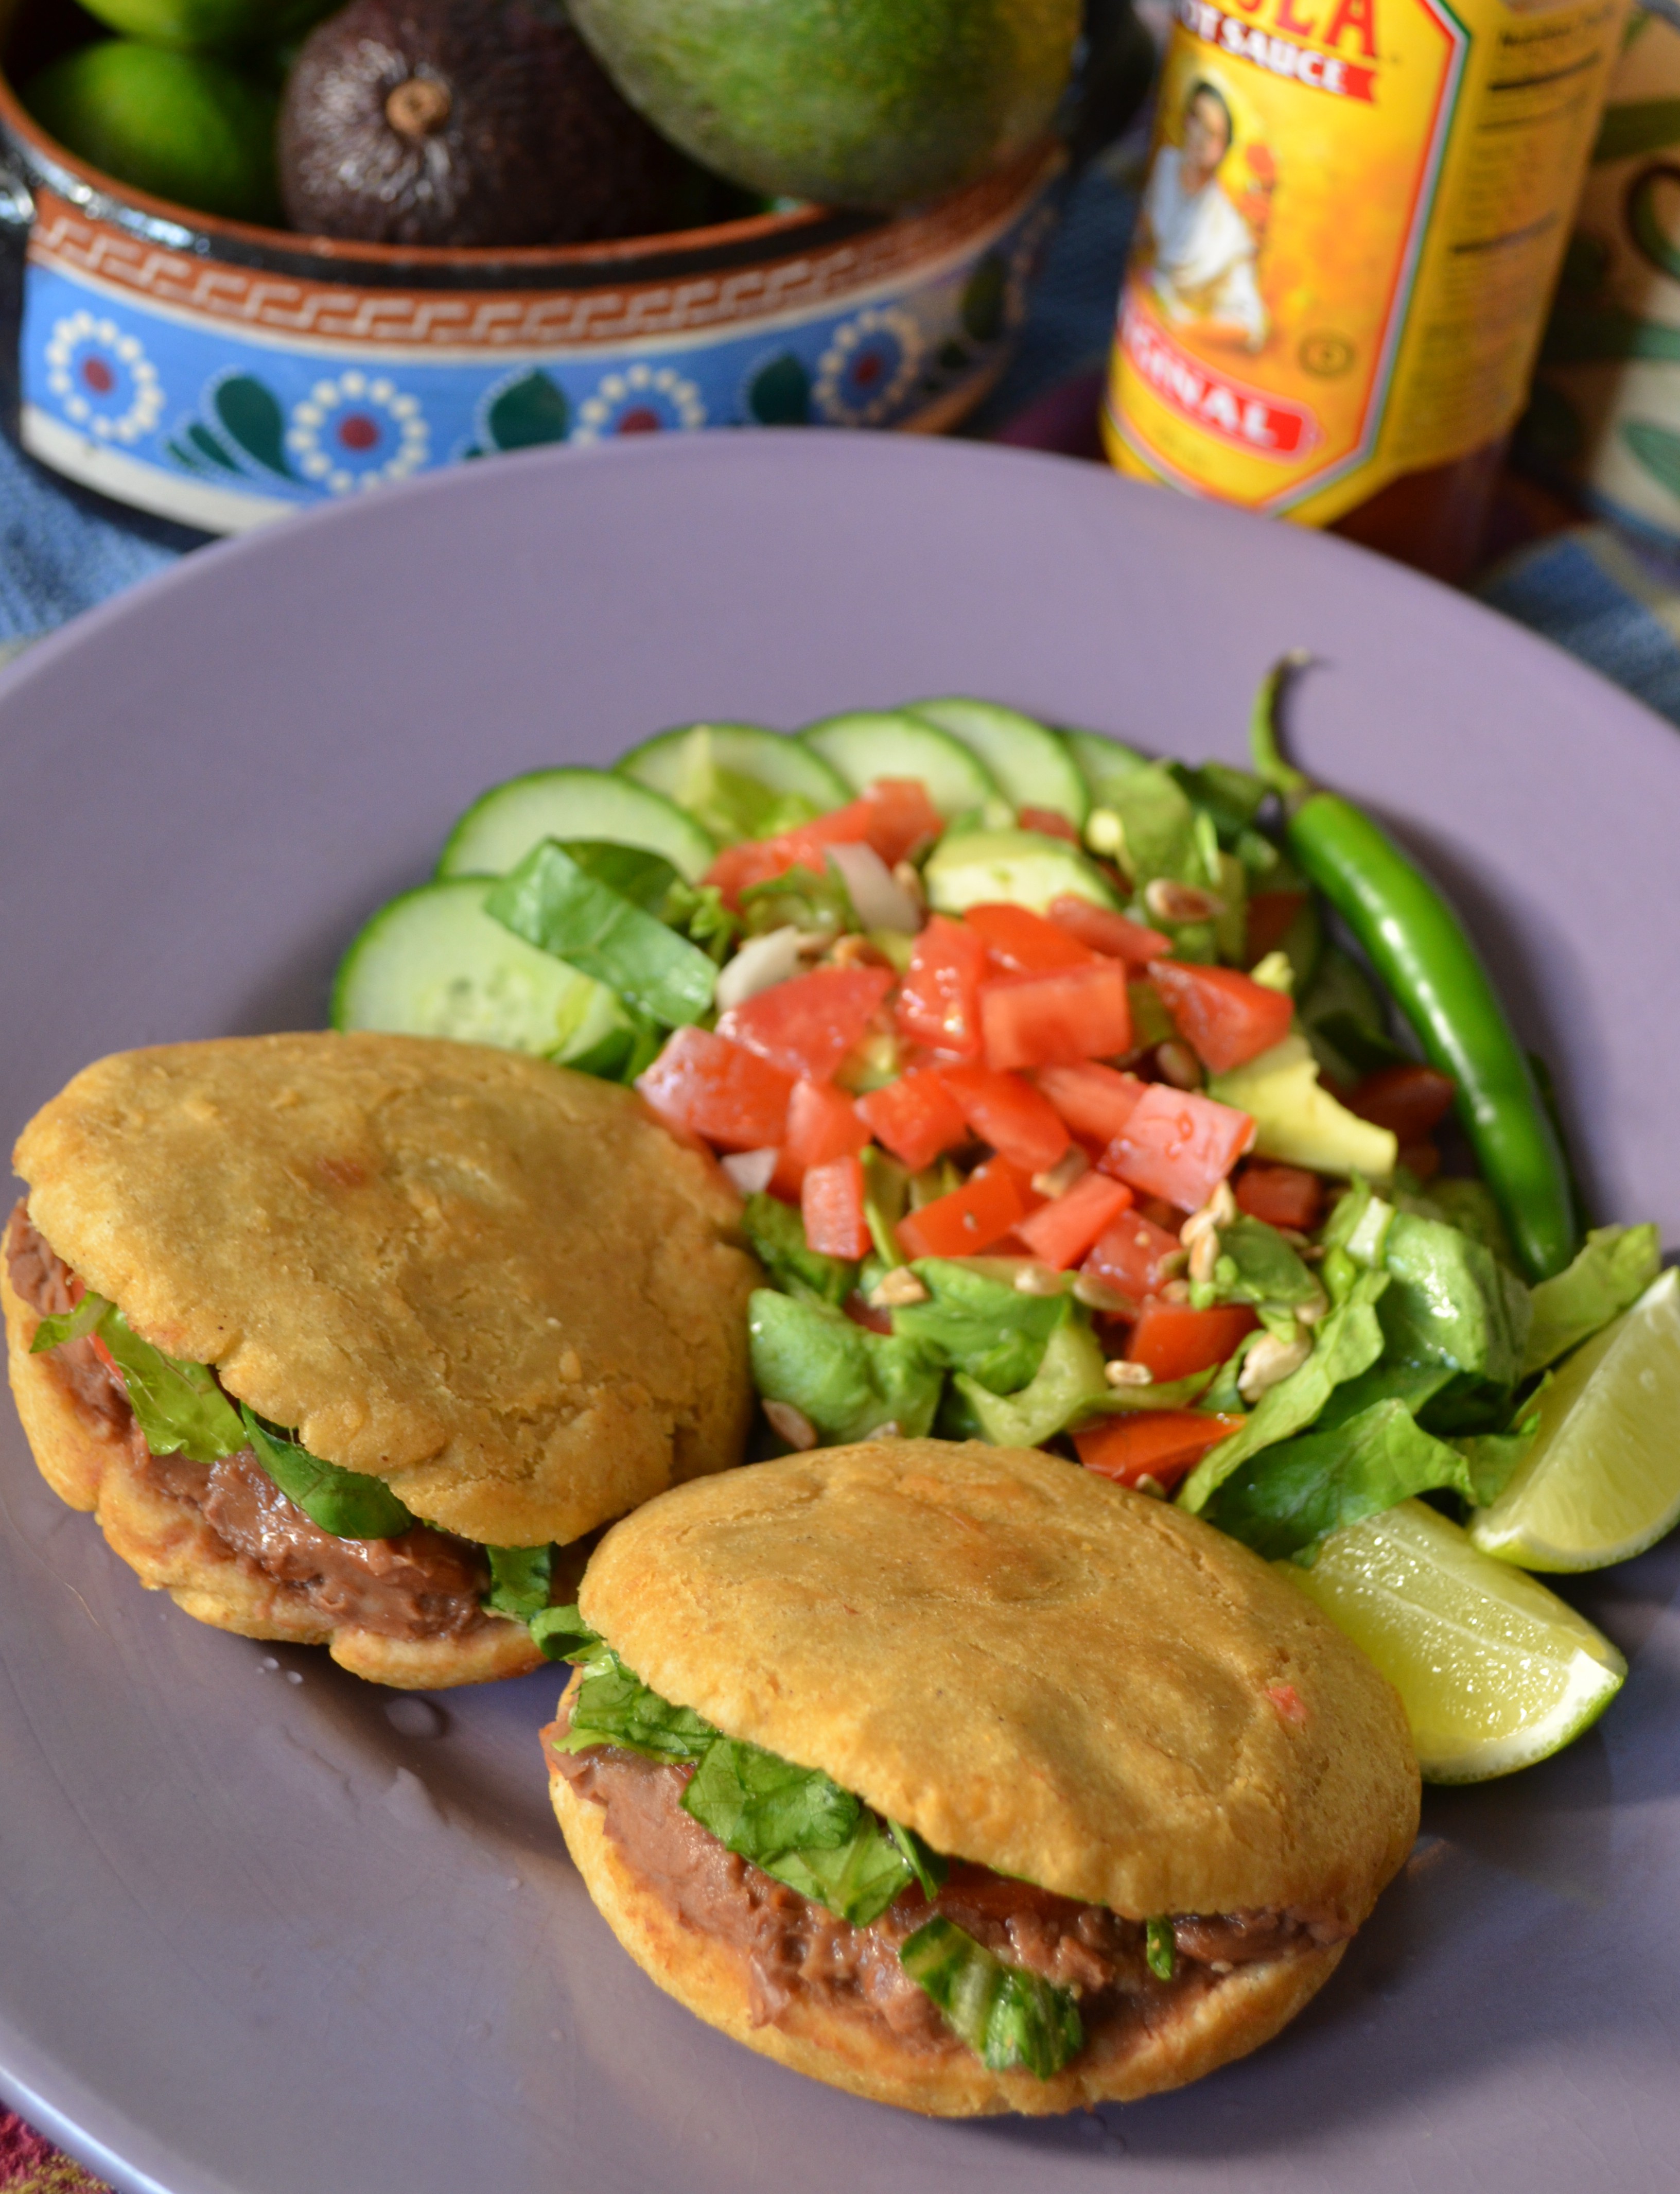
These are made simply of refried beans, lettuce, tomato. They are great dressed up with avocado, cilantro, onion, and pickled jalapeno or homemade salsa.
Hatch Chile Salsa Verde

Update: If you haven’t been over to Emily’s “Cooking For Kishore” you should really go give her a visit. Her very tasty looking, interesting recipes and the stories behind are always well presented and her food, whether traditional or fusion in style, reflects her multi-cultural life experience. I feel we kind of have the same general outlook since I post recipes that are based on my Mexican-American upbringing. Even though we come from different cultural backgrounds, we share a desire to make food that satisfies and adapts to a particular time and place without losing the sense of tradition. When she suggested that I participate in her series “Food ‘n Film”, I could not resist. Go here to see the October 2015 edition. Perhaps you’d like to join the fun. Now, you won’t find a salsa in “The War of the Worlds”, but this one will go well on the mentioned “…tamales, enchiladas, and hot dogs.” Of course, if I had a food truck out there, I’d be offering strictly vegan food. My black bean nachos with the Hatch green chile salsa would be a good seasonal special on the imagined menu. Why did I write about this particular movie, well, read on to find out. I’ll add that I’m a big fan of the old science fiction movies, not caring a bit if they are considered a B-picture or lower in rating. They take me back to the Saturday afternoon or late night TV presentations of giant creature movies like “Them!” “Tarantula” or “The Beast From 20,000 Fathoms”. Sometimes they were about invaders from outer space like “The War of the Worlds”. It was like a weekly special event watching those old movies. Many of them were weird and wonderful back then, and many of those seem even weirder and more wonderful now.
Thank you Emily for sharing this post!

Below is the post as was originally presented.
Have you seen “The War of the Worlds”, the original 1953 “Golden Era” of sci-fi movies version? It’s a big budget, Technicolor film that was quite a hit during it’s day. In my view, it’s very much an entertaining movie even for today’s era of special effects extravaganzas. While watching a dvd of it recently, I could imagine the blockbuster impact it had on audiences at the time. It’s a great movie all around. There is a scene early in the movie where the townspeople, officials, and journalists are gathered around a smoky crater where what they think is a meteor has crashed. The curious onlookers are discussing what do with the site. Someone suggests turning the area into a tourist attraction. A Mexican bystander(played by Canadian Jewish actor Jack Kruschen) exclaims enthusiastically that ”…tamales, enchiladas, and hot dogs” can be sold to visitors. It doesn’t seem like a big deal today, but this was 1953 Hollywood, decades before food channels and the internet. What’s also interesting to me is that he wants to sell Mexican and American food. He looked, spoke and ate like he could be one of our neighbors. Hotdogs are one of those foods that easily crosses cultural lines. We might have put salsa on ours, or taken a jalapeno with the yellow mustard or relish, but it’s still a hotdog. Fast forward 60 years, you can be sure traditional and non-traditional food trucks would be vying for space around that meteor, and if they’re selling Mexican food and hot dogs, imagine the fusion menu that might be offered. The food world has come a long way in the past 10-20 years don’t you think?
Now on to the salsa. The Hatch green chile buying season is winding down for us. As I mentioned in my “Hatch Green Chile and Roasted Garlic Sourdough Bread” post, we get them in our stores only 2 or 3 weeks out of the year. These chiles, which are imported from New Mexico, are very flavorful and versatile. I have been enjoying incorporating them into just about everything except my coffee. For example I’ve been adding them to a quick vegan rice pilaf/stir fry type of dish I like to make. (There’s fusion for you.) I’ve also been topping my potato tacos as well as my lentils or beans with some of the roasted diced chiles. Today I’m making a salsa verde with the help of a molcajete once again. See my previous post, “Salsa de Chile Pequin” for more photos. You may use the similar looking Anaheim chiles as a substitute, but it won’t be quite the same. Jalapeno or serrano peppers are other options. Our stores had a mild variety as well as a hot variety of Hatch pepper. I used hot chiles for this recipe.

To roast or not to roast. The Hatch chiles should be broiled or roasted. Tomatillos are either broiled, oven roasted or pan roasted. It’s nice to get the black blotches if possible. The cooking brings out flavor and sweetness from them. As far as the garlic and onion, you can do the same to whatever degree you want. I did them both ways and prefered to keep them raw this time.
Ingredients:
4 medium garlic cloves
3-4 tablespoons roughly chopped onion
3 Hatch green chiles for a hot salsa (2 for mild)
7-8 small tomatillos
leaves from 4-5 sprigs fresh cilantro
salt to taste
a pinch or two sugar (optional)
fresh lime juice to taste (optional)
Broil the Hatch chiles and tomatillos until they have softened a bit and you have some darkened spots. Turn them over from time to time to cook evenly. The tomatillos will probably take longer. It may take about 15 to 20 minutes for them to be done. Don’t let anything turn to mush as you want substance to work with in the molcajete. After the chiles cool, peel them and remove the seeds.

Begin by grinding the peeled garlic cloves into a paste with the tejolote(pestle). Add the onion and continue working to a paste. Next go in the chiles. Give them a rough chop beforehand if you want. No need to make a complete paste. Leave a bit of chunkiness if you like. Now work the tomatillos in one by one. You can peel them before, but the molcajete will take care of the peels if you keep at it. I like to at least keep the darkened blotches in the salsa. Careful not to squirt juice out while smashing! The salsa should be somewhat chunky. Add chopped cilantro and season with salt. Sugar and lime juice are optional. It’s really an easy salsa to make and the texture and flavor is distinct from those made with a blender. This simple but tasty sauce will brighten up your taco.

It went pretty good with the black bean nachos.

Salsa de Chile Pequin

I have these dried chile pequins that have been around in my kitchen for awhile now. They are usually a cook’s third choice after the more popular and accessible serrano or jalapeno peppers when making a salsa ranchera or salsa verde for example. But I very often pick several from my pequin bush to accompany a meal. The bush yields much more than I can eat so I either give some away or pickle them. That’s why I seem to always have a lot of dried ones to make use of. As you may know, they are extremely fiery. I love the burst of flavor and heat of the fresh pequins. If you’re not careful, they can hurt, especially if you chew slowly and deliberately or if you catch some in your throat. Toasting dried chile pequins bring out a wonderful nutty flavor which can best be appreciated by biting one on it’s own. Because they are so hot, a little to go a long way. They will not contribute as much flavor as other chiles like Anchos or Pasillas which need much more to get the same amount of heat. Many times though, I want a less complex tasting salsa to top my taco or to dip my tostadas.

I’m using a molcajete today to make “salsa molcajeteada”. Before blenders were available to the public (1937 according to sources), this was the only way to make this type of salsa. They lend your sauce a touch more of authenticity. The texture that results from “molcajeteando la salsa” adds an enjoyment that’s a little hard to explain. It’s a bit chunky, maybe a little bit juicy, depending on how you roast the tomatoes and how long you grind down the ingredients. It looks and feels more natural. A blender cannot duplicate a salsa made in a molcajete no matter how carefully you pulse.

I was honored to have my grandmother’s molcajete passed down to me. I remember years ago she told me it belonged to her grandmother’s grandmother. I don’t have any reason to doubt her but that would mean it’s been in the family for 6 generations?! That’s a little bit hard to imagine. I’m sure nobody has ever had to send it in for broken parts either.
I didn’t have to worry about curing the molcajete since it has long been prepared for use. (Well more than a century ago?) I’ll only mention today that if you decide to get one, it needs to be seasoned before use to remove tiny lava particles. Another important point is to never use soap to clean your molcajete. Read up on types, care and maintenence before buying one. There is a lot of info and video on the internet.
Dried chile pequins can be bought in many well stocked supermarkets nowadays. If they are not available, substitute with some fresh jalapeno or serrano pepper.

Ingredients:
4 medium cloves garlic
3-4 tablespoons roughly diced onions
10-12 chile pequins (for moderate heat)
4 ripe tomatoes
5-6 sprigs fresh cilantro
freshly squeezed lime juice optional to taste
salt to taste
Begin by pan roasting or broiling your tomatoes. To pan roast, heat a heavy skillet on medium and let the tomatoes roast until they have cooked and softened somewhat. Avoid overcooking to a mush. You can also broil the tomatoes for about 15 to 20 minutes, turning them over from time to time. In a separate dry pan, toast the chile pequins until they release their aroma and are lightly browned. Try one if you like.

Smash or grind the peeled garlic to a paste consistency with the tejolote(pestle). Add the toasted chile pequins and grind well. Next add the onions and grind everything into a paste. You’re ready to add the tomatoes one by one, grinding or smashing well after each additions. You can choose to remove the peel, but I find that the molcajete helps pulverize them. The charred bits add flavor. Add the chopped cilantro and optional lime juice and season well with salt. Many cooks add some of the salt in the beginning to help smash the ingredients.


The molcajete and tejolote will extract more flavor from your ingredients than a blender. You can work the ingredients as much as you like, making it chunkier or more blended to your liking.

The simplest of salsas can be the most memorable.

Hatch Green Chile and Roasted Garlic Sourdough Bread

If you want sourdough bread bursting with a southwestern flair, you have it right here. Packed with flavor, ingredients include the Hatch green chiles, freshly toasted and ground pasilla chiles and cumin, and of course the roasted garlic. The overall flavor turned out nicely balanced. The cumin is roughly ground so that every now and then you catch a little burst of its flavor. The pasilla chile, paprika and oregano are just barely in the background. Not one of the ingredients overpowers any of the others. Many times I’ll make a regular bread version first to get a rough idea of how much of each ingredient to use. Sourdoughs take at least 2 days while the simpler breads only take a few hours. Since I can only make sourdough bread on weekends, it saves me from going weekend to weekend coming up with a good recipe. For instance, I knew I had to make changes on the amount of green chiles and comino after I tried the tester.

Hatch green chiles make their way to Austin during August for a couple of weeks. Roasters that look like giant bingo cages are brought in to roast hundreds, probably thousands of pounds of chiles. The green peppers are grandly promoted in some of our supermarkets with all kinds of products featuring the chiles. You’ll find tortilla chips, all kinds of salsas, breads, dips, beverages, and much more proudly displayed for sale. What’s the big deal about these chiles? Because of the unique growing conditions, authentic Hatch green chiles are distinct in flavor and quality and must come from a certain area around Hatch, New Mexico. The small town in New Mexico has a festival devoted to the famed chile every year around Labor day. I’ve never been to it, but a friend co-worker who lived in New Mexico talks enthusiastically about it and the chiles. Do you see fresh Hatch green chiles in your town during this time as well? I wonder how far they travel in the U.S.
Instead of presenting a detailed step by step recipe, I’ll just list the ingredients and give a general description of the procedure. I’ll be happy to go over it in more detail if someone is curious.
This will make 2 medium size loaves
Levain:
1 1/2 teaspoons starter refreshed 8 hours before
100 grams bread flour
100 grams water (70 degrees F.)
Final Dough:
All of the levain
600 grams bread flour
200 grams whole wheat flour
400 grams water (78 degrees)
2 garlic bulbs
5 Hatch green chiles
1 tablespoon pasilla chile powder
1 teaspoon comino powder
1 teaspoon dried oregano
1/2 teaspoon paprika
18 grams salt

The night before I baked, I made the levain. I also roasted the green chiles and garlic bulbs to have ready the next morning.
On the morning of the baking, I peeled the green chiles and removed the seeds. I also toasted a pasilla pepper and some whole comino to grind. This could be done the night before as well.
I prepared the dough adding all the ingredients except salt. The levain is dissolved in water, the flours are mixed, then the rest of the ingredients are added except salt. The dough is left to autolyse for 30 minutes. I then added the salt and let it ferment for about 4 hours in a plastic container, giving it turns every half hour for 3 hours. For some reason this dough took longer to smooth out and become airy. It might have to do with all the diced green chiles that were in it.
I divided the dough into 2 portions and shaped them. I placed them in bannetons and gave them about a 4 hour final proof. They are placed on parchment paper and scored.
I baked them at 475 degrees in a convection oven for 10 minutes, misting them with water 3 or 4 times during this period. I then lowered the oven to 405 degrees and continued to bake them for about 20 minutes.

Notes: I took cloves from 1 1/2 of the 2 roasted garlic bulbs and mashed them before adding them to the dough. I added the remaining cloves whole.
You can substitute all the spices in the recipe with your favorite chile powder.
You can substitute the Hatch green chile with Anaheim peppers though it probably won’t taste the same. Poblano peppers are another option.

Besides croutons, this loaf makes great sandwich bread.
I’m going to take this to Angie’s Fiesta Friday and share this. I’m very sure I’ll find a lot of tasty food over there.
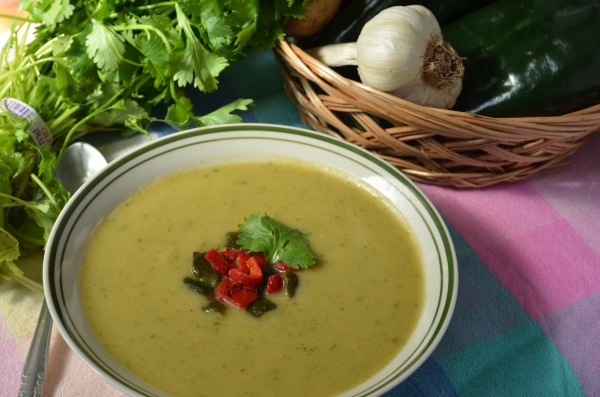
Chilled Potato and Poblano Pepper Soup

You know that Salvador Dali painting “The Persistence of Memory”(I looked it up), the one with the melting pocket watch? I’m always reminded of it during these blistery hot Texas summers. The streets look and feel hot enough to melt your shoes and time seems to be stuck at high noon. A good chilled (vegan) soup is always a welcome meal for me at this time of year. Gazpacho, chilled carrot and coconut, chilled tomato, or beet are just a few that I enjoy. Now, to describe some foods, there is “sweet and sour”, “hot and sour”, “chaux froid”, and maybe “sweet and spicy”. These are used in names of foods that have 2 seemingly opposing, or at least distinct, elements in the flavor or making of. Can you think of any others? This potato soup could be described as “hot and chilled”, “spicy and chilled”, “spicy cold”, or perhaps “fiery chilled”. Traditional vichysoisse is off my vegan diet of course, so I left out the cream and added a couple of Mexican ingredients. This full flavored sopa has a few distinct elements going on, the earthy taste of potatoes, the hot spiciness of the Poblano peppers, the herbal green taste of the cilantro, thyme, bay leaf, and peppers, and the cold temperature of the soup itself. By adding a garnish of your choice, you can further enhance the flavor. Now that I think of it, a melting pocket watch has 2 distinct qualities going on, a solid object and its softening as it melts.
For about 2 quarts of soup:
2 Poblano peppers for a mild soup, 3 for a hotter flavor
1 3/4 # to 2# potatoes peeled and cut into chunks
2 tablespoons olive oil
3 garlic cloves roughly minced
1 small leek (white part only with some green) sliced
1 small bay leaf
Pinch of dried thyme
4 cups vegetable stock (plus more as needed for consistency )
4 to 5 sprigs of fresh cilantro
Salt to taste
Black or white pepper optional

Broil the Poblano peppers for about 15-20 minutes on low to blister them. Turn them over from time to time to broil evenly. Remove from the oven and let them cool. Peel, cut them open, and remove the seeds and stem. Roughly chop the peppers and set them aside. Two peppers will give a mild pleasant spiciness, three gives more kick. I used three but used part of one to garnish with.
Peel the potatoes and cut them into chunks.
Heat the olive oil over low-medium heat in a pot and saute the (well washed) leek a couple minutes to sweat. Add the garlic and saute a minute or two. Add the thyme and bay leaf and continue another minute. Don’t let anything brown or burn. Add the potatoes and stock. Bring to a simmer and cover.
Cook the potatoes until they are tender then add the roasted peppers and cilantro to simmer for just a couple of minutes. Remove from the heat.
Let the soup cool down a few minutes to puree. A hand immersion blender works really well. Otherwise take your trusty processer and puree in batches. I left the bay leaf in there since I was using a blender. If you are processing it, you probably want to remove the bay leaf. I don’t think you’ll be able to get it completely smooth with the leeks and garlic as well. Season to taste with salt and optional pepper.
Put the soup in a container to chill down in the refrigerator. The soup will thicken up as it cools so you may need to add more stock. The soup tasted great when hot, so I couldn’t wait for it to chill down. Have you noticed that hot food seems to bring out spiciness but will temper down when chilled? Serve very cold in chilled cups or bowls. This soup lends itself to many different kinds of garnish to add another layer of flavor. Roasted corn kernels, red bell pepper, fresh oregano, basil or cilantro, or croutons are a few examples.

As I discovered, it’s also very tasty served hot as a fall or winter soup.
Let’s see, there is also “Baked Alaska”, “iced coffee”, “fried ice cream”….
A Tribute to Selma: Wholemeal Sourdough Loaf
I was saddened to hear about the passing away of Selma, a very dear friend to many in the blog world. Her enthusiastic and engaging spirit leaves a deep and positive impression on all who came to know her through Selma’s Table. Even though I didn’t get to know her as much as others did, I was still a receiver of her warm and friendly thoughts on some of my posts. She was quite versatile in the kitchen, cooking up a wide variety of delicious looking foods from around the world. She also had a visual knack for photographing her food. Though the photos looked spontaneous and as if the food was on the verge of being devoured, you could tell she put some thought into it. I had the impression that she had been blogging for years. But when I went to her “Archives”, I saw that she had only been going since August 2013. When I read her “About”, I saw that she had lived and cooked on 3 continents, an experience that gave her a very knowledgeable and unique perspective to cooking. Most important perhaps is that she was a big contributor to the camaraderie that was created among the circle of bloggers she was a part of. Please visit Angie’s very Special Fiesta Friday Tribute to Selma where you’ll find more about her.
I was impressed with her bread baking skills. Anyone who keeps a sourdough culture going very likely has an “all in” attitude with bread making. I enjoyed reading about her “Wholemeal Sourdough Loaf” . The process is an involved 3 day affair. It was a very beautiful looking loaf. In her honor, I made a wholemeal sourdough loaf very close to her version. My schedule doesn’t let me work it over 3 days, so I adapted it to a 2 day process. I followed her 50-50 ratio of bread flour to wholemeal flour to get the flavor as near hers as possible. I also used a generous amount of poppy seeds as she did to garnish the crust.
The result was excellent bread, with a tasty, full flavored, slightly tangy crumb. I also very much liked the flavor and appearance the poppy seeds gave the crust. If she had tried it, I bet she would have enjoyed it and given me good positive comments and suggestions. Coming from a fellow bread maker, I would have been all ears. We would have then struck up a nice conversation about our bread making processes, our sourdough culture, feeding schedules, our influences, and so on. I would have eventually told her I never thought of naming my sourdough culture. I wonder if someone took on to take care of her “Twinkle”.

Levain:
1 1/2 teaspoons sourdough starter (refreshed 8 hours before)
100 grams water (at 78 degrees Fahrenheit or 25.5 Celcius.)
50 grams bread flour
50 grams wholemeal (whole wheat)flour
Final dough:
All the levain
675 grams water (at 78 degrees F. or 25.5 C.)
500 grams bread flour
500 grams wholemeal flour
20 grams salt plus 40 grams water

Make the levain the night before you plan to bake. Dissolve the sourdough starter in the 100 grams of water. Add the 50 grams each of wholemeal and bread flours and mix well until it is all wet. Cover with a wet kitchen towel and let it sit overnight on the counter. At a 78 to 82 degree Fahrenheit (25.5-27 degrees Celcius)environment, the levain should take anywhere from 6 to 8 hours to ferment properly. Take a spoonful of levain and drop it in a bowl of water. If it floats, it’s ready to use. Time your process so that you begin the bread making at your convenience. I make my levain around 9 or 10 pm so that I can start early the next morning.
To make the dough: Put the 675 grams of water in a large bow. Add the levain and disperse it. Mix the two flours together until it looks uniform. Add the flour mixture to water/levain solution and mix well until it is all moistened. Cover with a wet kitchen towel and let it autolyse for 20 to 30 minutes.
Dissolve the salt in the 40 grams of water as best as you can. Squelch ( I like the word Selma used in her instructions) the salt solution into the dough. Place your dough in a lightly oiled container for fermenting. Cover with plastic.
After 30 minutes, give the dough a “turn”. Grab a lower portion of the dough and stretch it over the top. Do this another 2 or 3 times. Cover the dough once again. In another 30 minutes, repeat the process. You’ll continue the turns at half hour intervals for 3 hours. During the last hour, handle the dough gently so as not to break up the tiny holes that are beginning to form. After 3 hours the dough should be airier, and about 20 to 30 percent larger in volume. It also depends on the temperature of your kitchen. If you need more time, continue the process a little longer until the dough is ready.
When the dough is properly fermented remove it from the container and place it on your work counter. A marble pastry board works nicely for this. With a pastry cutter, divide the dough into 2 or 3 portions. Shape each portion into a round. With the help of your pastry cutter, gently work the portions so that you create good surface tension. This helps create a condition for good oven spring. Lightly flour the dough with flour and cover to let rest for 20 or so minutes.
Carefully turn over one of the portions upside down. Get a hold of about 1/3 of right side of the round, stretch it to your right, and pull it over the middle. Do the same with the left side, the side closest to you, and the side furthest from you. Turn the dough over so that the smooth side is once again on the top. Repeat with the other portions. Selma also used this technique for shaping.
This dough is wet enough to require bannetons or proofing baskets. Without them, the dough would flatten out during the final proofing. Line your baskets with a smooth kitchen cloth. Dust them with flour so that the dough does not stick to them. Place the dough in the cloth-lined basket upside down. Again, lightly flour the top and cover with plastic. Now cover with the overhanging cloth. Repeat with the other portions. Let them proof for about 3 hours. They will have increased in volume by about 30 percent. If not, let them proof longer. It depends on the ambient temperature. The warmer it is, the faster the proof.
About 30 minutes before baking, pre-heat your oven to 500 degrees Fahenheit (260 Celcius). Put your baking stone in if using one.
Cut out a piece of parchment paper slightly larger than size of the dough. Uncover the dough from the cloth and plastic and place the parchment paper on top. Place a pizza peel on top. Carefully turn the whole thing upside down. Remove the basket, then the cloth. You now have the dough sitting on the parchment paper and peel. Sprinkle the dough with poppy seeds or topping of your choosing and score the dough. Your are ready to slide it onto your stone or baking sheet.
With a water mister or spritzer, mist the oven 3 times during the first 7 or 8 minutes of baking, then lower the oven to 450 degrees F. (232 Celcius). The loaves should be done in about 20 minutes. Rotate them about halfway through baking to insure even baking.
Remove from the oven and place them on a rack to cool completely before slicing.


I made a simple hummus to go along with the bread though I bet her “Roast Fennel and Cannellini Bean Puree” and “Roast Aubergine w/miso &Harissa” would be perfect.
Thank you Selma for sharing so much.
Roasted Tomato and Jalapeno Bread

What is “Southwestern Cuisine”? Some food history enthusiasts see it as a particular culinary movement influenced by Native American, Mexican, Spanish, and cowboy food that began during the 1980’s. Other may view “Southwestern” food as the fusion of the food of these cultures that has been developing into regional traditions throughout states like Texas, New Mexico, Colorado, California for at least a couple of centuries. Either way, the food is characterized by bold, rustic flavors with chiles, corn, tomato, beans, and of course meat and poultry faring prominently. Trying to define “Southwestern” food has had me looking down a wormhole that I’m not ready to go down yet. Is Tex-Mex considered Southwestern food? This bread, though not traditional, includes jalapenos, tomatoes, and cornmeal in addition to wheat flour.
The reason for this bread really is to celebrate the One Year Anniversary of “Fiesta Friday” , a virtual potluck of foods hosted by Angie of “The Novice Gardener”. This brilliant idea of a virtual weekly event has brought together many food bloggers together to share their labor of loves. The passion and creativity behind the food is always truly inspiring. There are usually vegan and vegetarian options as well, so there is something for everybody. I bring this bread to acknowledge Angie’s tremendous hard work and commitment it takes keep this weekly event going. I’ve seen that it has added much fun and joy to blogging for so many. This simple bread is not a tour de force appetizer, entrée, or dessert you’ll regularly see at Fiesta Friday, but I think it’ll make a decent accompaniment.
I have to admit though that this recipe needs tweaking. The crumb was tighter than I would have preferred and that was no doubt caused by the use of cornmeal and whole wheat flour. Leaving out the cornmeal I think would give it a more airy and tender crumb. The cornmeal didn’t add much flavor either. I think I would prefer a simpler flavored dough to let the roasted tomato and jalapeno flavor come out more. This bread deserves an updated and revised recipe. I may include the new improved version at this post.

For 2 large or 3 medium size loaves.
Pate fermente:
3 cups bread flour
1/2 teaspoon instant yeast
1 teaspoon salt
1 1/2 cups water
Cornmeal soaker:
1/4 cup cornmeal
1/4 cup water
Slow roasted tomatoes:
3 # ripe tomatoes or 3 pints cherry tomatoes
Olive oil to drizzle
Fire roasted jalapenos:
1 to 2 medium size jalapenos depending on how spicy you want the bread
Final dough:
All of pate fermente
All of cornmeal soaker
2 cups bread flour
1/2 cup whole wheat flour
1 3/4 teaspoon yeast
1 1/2 teaspoons salt
All of the roasted tomatoes
The fire roasted jalapeno pepper

To make the pate fermente mix the bread flour, yeast, and salt together in your mixing bowl. Add the water and stir to form a loose shaggy dough. Mix on the recommended speed for your mixer until it is smooth and elastic, about 5 to 7 minutes. Shape into a ball and place in an oiled bowl. Move the dough around so that all sides get oiled. Cover with plastic and let it sit to ferment until it is about 1 1/2 times larger in volume. Carefully degass the dough to reduce it to the original size. Cover it again with plastic and store overnight in the refrigerator.
For the cornmeal soaker mix well together the cornmeal and water in a small container. Cover with plastic and let it sit at room temperature overnight. This helps soften the cornmeal and develops a little flavor.
To roast the tomatoes, slice them in half, place them cut side up on an oiled baking tray, and drizzle lightly with oil. Put them in an oven preheated to 225 degrees and roast for 5 to 6 hours. Cherry tomatoes will take less time, maybe 3-4 hours, so watch them carefully. Sometimes I prick the tomatoes with a fork from time to time to help evaporate the liquid. The tomatoes should shrink, lose most of their moisture, and develop a more intense flavor. You can do this the night before and then store in the refrigerator.
To fire roast the jalapenos, place them above a flame on your stove top and char them slightly. If you don’t have gas flame, you can also roast them in your oven.
On baking day, remove the pate fermente from the refrigerator about an to 1 to 1 1/2 hours before you begin to allow to get to room temperature. Rough chop the tomatoes and allow to reach ambient temperature. Finely chop the jalapenos as well. Include most or all the seeds depending on how spicy you want the bread to be.
When the dough is ready, cut it into about 10-12 pieces with a knife or pastry cutter. Put the pieces in your mixing bowl along with the bread flour, yeast, salt, and cornmeal soaker. Mix everything together well with a spatula to form a loose dough. If the dough seems too dry, add some water it get it manageable enough to knead. Now mix with the paddle attachment for 3 to 4 minutes. Begin adding the chopped tomatoes and jalapeno. Depending on how moist they are, the dough may get wetter. Add bread flour as necessary as you continue adding the rest of the tomatoes. Continue mixing until the dough is smooth and elastic. This should take abut 5 more minutes.
Remove the dough from your mixer, form it into a ball, and place it in an oiled bowl. Roll the dough around to get it oiled on all sides. Cover with plastic and let it ferment until it doubles in size.
Remove the dough from the bowl, lightly degass it, and divide it into 2 or 3 portions. Form them into a round shape. Put each on parchment paper (if using a baking stone), lightly oil them with spray oil, and cover with plastic. If not using a baking stone, put them on an oiled baking tray. Let them proof until just about twice in volume. While they are proofing, pre-heat the oven to 475 degrees. Be sure to put your baking stone in place if you have one. The parchment paper makes it easy to transfer the dough from your counter to oven.
When the dough is ready, lightly top with cornmeal, and slash them as desired. Place them in the oven. Spritz with a water mister to simulate steam. Do this 2 more times, within 10 mintutes and lower the oven to 400 degrees. Bake until they reach an internal temperature of 200 degrees, about 20 to 25 minutes. Put them on a rack to cool completely before slicing.
Notes: The trickiest part about mixing the dough is keeping it from getting too wet while adding the tomatoes. If you didn’t fully roast them, they will release much of their juice, requiring an addition of flour.

Baby lima bean soup w/chipotle pepper

This soup falls under the category of “Soups made several times the past 2 weeks”. What makes it for me is the great natural pairing of the creamy “sweet” baby lima beans with the smoky spicy flavor of the chipotle pepper. I keep the ingredients for this soup to a minimum to let the two main components shine. I didn’t know this, but lima beans are native to Peru. I always associated lima beans with southern U.S. cooking so I never made the connection of the name to the country of origin. They are nowhere to be seen in Tex-Mex cuisine and I couldn’t tell you how pervasive they are in Mexico. What’s confusing are the various names it is called in Spanish. I’ve come across a couple of Mexican soup recipes using “habas”, which they translate into “favas”. Yet a bag of “Baby Lima Beans” I bought also had “Habas Pequenas” in the title. Fava beans I’m familiar with are a different shape, have a much “meatier” flavor to them, and sometimes require removing the skin. Among other names, lima beans are known as Judias Blancas, frijol blanco, and frijol de media luna.

1 # dry baby lima beans
2 tablespoons olive oil
1 medium size carrot peeled
1 medium size celery stalk
1/2 medium size yellow onion
3 cloves garlic
8 cups vegetable stock or water (or a combination of both)
1 bay leaf
1/8 heaping teaspoon dried thyme
1 tsp. salt
1 to 3 seeded chipotle peppers in adobo (to taste)


Wash and sort through the beans. Dice the carrot, celery, and onion into medium dice pieces. Mince the garlic cloves. Get your soup pot hot over medium high heat and add the olive oil. Saute the vegetables for a minute or so to sweat. Add the vegetable stock and/or water along with the baby lima beans. Bring to a boil, lower to a good simmer and cover the pot. Cook until done. This will take at least 2 hours but check from time to time to see how they are coming along. They should be just tender. Add more stock if necessary during the cooking.
When the beans are done, remove the bay leaf. With a hand immersion blender, puree the beans until the soup is smooth. A food processer will also work. Add the 1 or 2 seeded chipotle pepper with some of the adobo sauce and puree. You may choose to remove some of the beans during the pureeing and return them to the puree to give some texture to the finished soup. Adjust with stock if necessary to reach your desired thickness. You may also wish to blend in more of the chipotle pepper. Season with more salt to taste.
Notes: Because I didn’t give the beans an overnight soak, or a quick soak, they took a while to cook. Just be sure to adjust your cooking time if you soak the beans.
For more smoky flavor, I remove the seeds of the chipotle so that I can add more of the chiles. If you are unfamiliar with chipotle peppers en adobo, you can find them canned in many supermarkets nowadays. The above photo shows the chipotle pepper along with a fresh jalapeno pepper, its raw counterpart.
Using all vegetable stock gave the soup a richer taste, while using water allowed for the flavor of the beans to come out more. I also liked using 4 cups of each. Flavoring with vegetable bouillon is another option.

This bowl was garnished with fried tortilla strips, epazote, and pan roasted and ground dry chipotle pepper. The added dry chipotle gave a little more heat but also a more intense smoky flavor. The gorditas (at left) made a great accompaniment. Of course, gorditas are normally stuffed with various ingredients but these simple plain ones went just fine with the soup. Stay tuned for an upcoming recipe.
Chochoyotes (Masa Dumplings)
These dumplings will add a tasty, rustic, Mexican flair to your soup or stew. I’ve been reading that there are many regional variations, mostly in the state of Oaxaca, Mexico. Achiote, onions, cheese, jalapeno or cilantro are just a few possibilities. It seems they are used in many types of soups and I myself have found that because of their versatility they can compliment soups not related to Mexican cuisine.
This recipe uses dried masa harina which can be found in the baking aisle in many supermarkets nowadays. If you can get your hands on fresh masa, so much the better, though some slight adjustments to the recipe will have to be made. Lard is a traditional ingredient used in chochoyotes, but I’m replacing it with vegetable shortening here. Olive oil, I understand, can also be used as a substitute. This easy 4 ingredient recipe below is the most basic version.
For about 16 to 20 dumplings
1 cup masa harina
1 teaspoon salt
1 1/2 tablespoons vegetable shortening
3/4 cup warm water
For 1 batch I added 1/4 cup loosely packed chopped cilantro, for a second batch I added 1 teaspoon each of ground toasted chipotle pepper and ground toasted Ancho pepper. You can make your own interpretations though. Let me know if you make some!

Mix the masa harina and salt together. Include optional ingredients if using. Add the vegetable shortening and incorporate it until well dispersed. Add all the water except a couple of tablespoons or so and incorporate well. Let the dough rest for about 15 minutes. This will allow the water to be full absorbed. The dough will be pliable, not too dry and not too moist. Add a little more water if necessary. Form a portion into about a 1 inch ball. With your index finger, make a dimple or indentation. This shape helps the dumplings cook evenly. Continue with the rest of masa. Gently add them to your slow simmering soup which has reached or very nearly reached the end of cooking. As you place them in the pot, try to keep them separate so that they do not stick together. Continue on a simmer for about 10-12 minutes. The dumplings should turn out soft but with a nice substantial bite, something like a flour dumpling.

The dumpling can even hold a little bit of the soup.

This “vegetable stew with no name” was made with ingredients I had on hand at the time. Garbanzos (chickpeas), gandules (pigeon peas), eggplant, tomatoes, carrots, celery, onions, garlic, thyme, oregano, a bay leaf and vegetable stock melded nicely for a simple but hearty and tasty meal. Adding the chochoyotes gave it a welcomed serious Mexican twist. I then splashed a bit of bottled hot sauce for a little extra kick. Great anytime of year but very nice for those cold rainy winter days. I also made a puree of baby lima bean soup with chochoyotes which worked out well.

As Michael Pollan takes us through his sourdough bread odyssey in the third chapter of his book “Cooked”, he intersperses his descriptions with historical information and a layman’s explanation of what is happening on the microbiological level. It is a very reader friendly account of the process. Those of us who have felt the apprehension of making our first loaf of sourdough bread can relate to his getting “mentally prepared” for the work. For most, it is an endeavor that is anticipated to yield mediocre results at best and utter failure at worst. He is certainly not expecting to come up with a prize winning loaf of bread the first time around. For those who are interested, the role of wild yeast (and bacteria) in creating a sourdough culture is explained in a way that doesn’t remind one of a science textbook. Much of what exactly goes on in the starter and in dough is still a mystery to the scientists. But if you ever wondered about what makes homegrown yeast special compared to the commercially made variety, or how the mixture of four disparate bread ingredients transforms into a smooth elastic aromatic dough and eventually into the extraordinary final product, then here is a nice and easy readable place to find out. For example, he cites a 1971 study by the USDA entitled “Microorganisms of the San Francisco Sour Dough French Bread Process”. The team found that no single yeast type was responsible for the success of the sourdough culture. Instead it is a complex collaboration between a yeast and a bacteria which forms a kind of micro ecosystem where the microorganisms benefit from the other’s coexistence. To date, about 20 different yeasts and 50 different bacteria have been found in sourdough cultures around the world. Commercially made yeast on the other hand doesn’t do well in a sourdough type of environment, so complex relationships aren’t allowed to flourish. Its predictability anywhere in the world makes it well suited for mass production of products though it will never extract the depth of flavor and quality that is inherent in wheat. After reading the section on sourdough starters, I gained a better appreciation of the fact that the way bakers take care of their sourdough culture affects the quality and characteristics of the final result. Ambient temperature, food, amount of water, and feeding schedule all determine the environment of the “micro universe” of the starter. Though the author gets into some biological detail he always seems to be primarily concerned with sharing information that helps the reader understand the bread making process.
What is also appealing and useful about the writing style is that as Pollan takes us through the method, he fully explains the purpose of each of the techniques. He also describes the visual cues the baker should be looking for, what the material should feel like, and what aromas should be detected. Very few books on bread making that I have seen are as thorough in their presentation. After the sourdough starter, he continues with the making and development of the levain, which is the small mix of starter, fresh flour, and water that will be used to inoculate the final dough. He then takes us through the mixing and development of the dough itself. Along the way he devotes four very informative pages on gluten. He is constantly fleshing out the entire process with interesting historical or practical information for us to consider. When the dough has finally been baked he describes some signs on the loaf that are symptoms of particular qualities. I won’t spoil your reading by describing the result of his first bread. Get the book to find out!
True to the baking experience, Pollan makes it clear that the baker must develop his own sense of timing for the particular situation. He is merely giving some guidelines for the baker to use in crafting a bread that is being aimed for.
After making his first loaf using Chad Robertson’s recipe from “Tartine”, Pollan decides to go for quality control by visiting the baker himself. To be continued.
See previous post for Pt.1.

“One way to think about bread-and there are so many: as food or Food, matter and Spirit, commonplace, communion, metaphor, and medium (of exchange, transformation, sociality, etc.)-is simply this: as an ingenious technology for improving the flavor, digestibility, and nutritional value of grass. True, the technology doesn’t work for all grasses, mainly just wheat, and it really only works for the seeds of that particular grass, not the leaves or stems. So it’s not quite as ingenious as the ruminant’s system for processing grass. The cow carries around a whole other stomach for the sole purpose of fermenting all parts of all kinds of grass into usable food energy. Our single stomach can do no such thing, but when, about six thousand ears ago, we learned how to leaven bread, we joined the grass eaters of the world in earnest, much to the benefit of our species (not to mention the grasses).”
So begins the chapter “Air-The Education of An Amateur Baker” from Michael Pollan’s “Cooked-A Natural History of Transformation”. I’m not familiar with a lot of his writing, but I’ve read enough to know that the short little intro to this chapter packs a lot of potential for what may come to inform and entertain the reader. In case you are not familiar with Pollan, he writes very observantly about food and the processes taking it from nature, farm, or field to table. He covers the full spectrum from cultural, political, and ecological concerns to health issues. Whatever your lifestyle may be, he will usually offer a new angle, or fresh perspective for you. Some of his other works include “In Defense of Food”, “The Botany of Desire”, and “Food Rules”. Ironically, he says that he has always had only a mild interest or passion for cooking itself. Eventually however, he discovered that the answer to personal, political, and philosophical questions were found right in his kitchen. “Cooked” concerns his education in learning how to cook well. What an education he has! He divides the book into four chapters, “Fire-Creatures of the Flame”, “Water-A recipe in seven steps”, “Air-The Education of an Amateur Baker”, and “Earth-Fermentation’s Cold Fire”. For each element, he apprentices under an appropriate master chef. For this chapter, none other than master bread maker Chad Robertson of “Tartine” fame serves as his teacher. I was very excited to read this chapter because I have used and adapted Robertson’s method to many breads I have made. Lucky you Pollan, you get to work with the master. Pollan has more than earned his way to time and tutelage under Robertson. I’m very interested in Pollen’s experiences and observations as he works with the dough. I’m also interested in his interaction with his teacher. What will be Robertson’s teaching style for him. A lot would depend on how much time Pollen was intending to work with him. I suspect Robertson would feel it to be more of a crash course. He’ll probably show him the basics with a good foundation so that Pollen can develop on his own. In order to give Pollan more to consider, I imagine Robertson will elaborate on the nuances that affect the bread making process. Will the author develop further interest after the project?
I’m not a reviewer by any means, this “review” is more of a “play by play” in real time as I read the chapter and try to understand the author’s side of the experience. I’ll present it in a series of parts so as to keep the posts short and sweet.
The first section is titled “A Great White Loaf”. He begins with a general history of the evolution of bread making. With his summation he put baking in a fresh historical perspective for me. He has made me ask myself—In the grand scheme of bread making, what are modern day bakers doing to push the envelope? How are they, in his words, “… improving the flavor, digestibility, and nutritional value of grass”. Pollan writes that Paleolithic hunters made use of grasses as part of their energy consumption and eventually these grasses became a bigger part of their diet when they discovered the beginnings of agriculture. A relationship developed between man and the grasses he cultivated. The grasses evolved to be more efficient for man and we developed enzymes to more easily digest the starch in the seeds. The seeds still had to be “processed” in order for the precious nutrients to be unlocked and absorbed. Initially this was done by toasting on a fire or ground between rocks before boiling to a mash. It was discovered that this mush tasted better when it was left on a hot stone to cook, thus creating the first “flatbread”. Then about 6000 years ago in Egypt, it was noticed that some of this mush, perhaps left alone for a couple of days miraculously seemed to come alive expanding in volume. When this porridge was put in an oven, it grew even more, producing an airy but solid edible mass. The flavor and texture was much more interesting than the mush they had been eating. From then on, bread making has been a history of improvement whether by design or accident.
Reading about the important junctures in that very short summation of the history of bread reminds me of the times when I was surprised at the vigorous activity of yeast in a sourdough starter. Once a partially closed container popped open from gas pressure that had built up. During the fermentation of a couple of poolishes, bubbles would form at the surface and burst every few seconds. In one of my early attempts of making bread I couldn’t believe the dramatic oven spring that resulted in one particular loaf. There is a big part of bread making that still connects us to the ancient days. Those who have grown and milled their wheat and constructed their own stone ovens are even much more connected to the tradition.
I think Pollan has hinted at one approach he’ll take in his endeavor to get a feel for bread baking. The techniques he’ll learn will be ways to help him extract maximum flavor and best crumb structure for his loaves. As the title of the section suggests, he’ll very likely focus on using flour, water, salt, and natural yeast, the bare minimum of ingredients.
Before I end this part, I must mention that I disagree with his associating each of the cooking methods with a distinct element, in this case, air with bread baking. In my humble opinion, bread making involves an interaction of all 4 elements–fire, water, air, and earth. Perhaps he means to highlight the element that comes most into play with each cooking method.
My Writing Process Tour

It’s a little hard to believe my last post was on June 30th, it really seems like only several weeks ago. At that point we were having 100 plus degree weather in Austin and I had planned to come up with some chilled soups, paletas, and maybe a liquado or two to combat the heat. But here we are with fall in the air and Dia de Los Muertos and Halloween less than a week away. Remember when you were a kid on the last day of school ready to jump into the summer which was like an eternity when you could play all day every day to your heart’s content? You r’member! Not having experienced any kind of adult responsibilities, we couldn’t fully appreciate it. But we didn’t have to, we were totally in the moment of enjoying life as only a kid knows how. As adults, our calendars are full of days marked with deadlines, appointments, and must do’s. Depending on what kind of job you have, you have mini-deadlines created for you within the day. Having worked in kitchens for many years, I can attest a cook is constantly working against or with the clock, depending on how you see it. The kitchen may seem relaxed at the beginning of the day with the clock on the wall and that second hand moving so slow. Yes let’s enjoy our coffee a couple of minutes before we start prepping up the soup de jours. What’s the rush? (That’s a very tiny bit of the kid in the summer feeling being relived there.) Then the deadline for the misce en place and/or the presentation of the extensive buffet approaches. As we get closer to zero hour, that clock on the wall doesn’t seem to be moving so slowly anymore. That’s especially true the last half hour or so when most foods are being cooked for maximum freshness and appeal. If you’re working with an a la carte menu, a different sort of manipulation of time is an essential skill to develop. “Time in the Kitchen” sounds like a good title for a post , doesn’t it? Here I go again, making plans too way ahead again. My point is that time has flown by lately for me. In any case, it feels good to be back and wipe the dust off my blog. I hope to get back to more regular posting. No deadlines though.
Now to the important stuff. I must first thank Ginger from Ginger and Bread for nominating me for the “Writing Process Tour.” It’s so nice to get the support and encouragement! I’m not very big on blogger awards because I always feel awkward nominating others. I accepted (so many weeks ago!) this non-award because it would give me a chance to think about where my blog was going. It also gives me an opportunity to acknowledge a few fellow very inspiring bloggers. I have always enjoyed reading Ginger’s very well written and visually beautiful blog and learning about foods from her native southern Germany. She also introduced to me many other foods during her world soccer tour of countries. She is quite adept at making delicious looking loaves of bread from her tradition and beyond. She knows what she is doing. Being a bread enthusiast myself, it’s educating and fun reading about her breads and methods of baking. In her Schwarzbrot post, she writes about her adaptation of a recipe from a 1951 cookbook that’s a an updated version of the original 1912 publication. I love that she included photos of the second hand book and a few of its pages with all its stains and hand written annotations. She also has a photo of a typical “Abendbrot” with her bread. She relates she is aiming for a certain flavor or sourness in her loaf, so she continues with a 2nd version of Schwarzbrot, honing in on what she is going for in the bread. Even though I don’t come from a sourdough bread tradition, I can relate to that. I always have a certain flavor and sourness I work towards in the sourdough bread I make. So she has wonderful photos, recipes from her German tradition, and explanations of her baking or cooking processes. What more do you want? Well, she also writes about her trips around England and her native Germany. Her post about a cottage and garden in Dungeness, Kent conveys the surreal nature of its locality. Thank you again Ginger! I apologize for taking so long to follow up on the “Writing Process Tour.”
The rules for the Writing Process Tour are the following:
1. Acknowledge the person who nominated you.
2. Answer the tour’s 4 questions.
3. Select three others to participate.
1. I could go on about Ginger and her blog. Do visit her site.
2. What am I working on? Trying to improve my baking. In general, I continue baking breads and making tortillas as often as is practical. At work I bake bread as regularly as time allows. That gives me a chance to try different styles and get immediate feedback. At home, I usually have homemade bread ready or in the freezer. I also enjoy making tortillas as often as I can. Pre-dawn hours on weekends are my favorite time to make them. It’s quiet, I have my freshly made French roast by my side, and two whole work-free days are ahead of me. I can never get enough practice.
How does my work differ from others in the genre? In terms of the approach, it’s not much different from other blogs. I sense there is a lot of experimentation going on in food blogs like there is in mine. That’s part of the fun and challenge. Also, everyone brings their unique perspective to their subject matter. My perspective on bread baking is from a 2nd generation Chicano (Mexican-American) background. I must also mention that this a vegetarian friendly blog with “Jalapeno and Cheddar Cheese Sourdough” being my last non-vegan recipe. From here on out I plan to write only vegan-friendly entries.
Why do I write what I do? I write to express my cultural background as it relates to my cooking. I’ll include traditional recipes from time to time, especially those I grew up with. They will often inspire a variation. But I’m also very interested in making new recipes, foods with flavors that might make sense alongside a typical Tex-Mex or Mexican meal. I will try my best to explain the background or story of a recipe so that the reader knows exactly what it’s about. In these times when much of the culinary world is getting eclectic and fusion orientated, I think it’s important to know the origins so that a sense of where the recipe stands in relation to a tradition(s) is not lost.
How does your writing process work? Much of my inspiration is from family cooking, foods I grew up with. Many times I take typical Mexican or Tex-Mex ingredients and think of a way to incorporate them into a bread, tortilla or other food. Local ingredients, though not necessarily associated with Mexican food are also fair game. For record’s sake, I always write down notes for potential recipes in a notebook. In fact, I keep 3 notebooks, one with recipes for breads, one for tortillas, and one for ideas. I’ll look back through the notes and have a very hard time remembering I even did some of recipes! It sure helps going over and reviewing mistakes or suggestions I noted. Sometimes I’ll return to an idea I had months ago and try it. My latest entry is a for a 3-seed sourdough. Sunflower, pumpkin, and sesame seeds are obvious choices. How can I make it unique and personal? If I decide to go for it, the process might take a couple of weekends or more to get it to my satisfaction. I usually describe in the post what adjustments I made. I also find myself finding ideas, inspiration, and reference material from cookbooks which I mention in my posts.

3. I’m choosing Marcella Rousseau at For Your Good Health as someone to participate in the Writing Process Tour. She writes very informatively about different aspects of well being and does so from personal experience. Diet, exercising, and health promoting activities are just some of the topics she explores. She can also point you to good resources for you to investigate. I usually find myself smiling while reading her posts which are written with an understated and heart-felt humor. She’ll be the first to tell you that smiling is good for you. Thank you Marcella!
Another person I’m choosing is Marwinna with her delicious looking loaves at Bread & Philosophy. There was no way I was not going to follow her blog when I came across it. Her niche of bread baking of course got my attention. Cooking and baking is much more than just following recipes as all us fellow food bloggers can attest. So it’s interesting to see her perspective on the experience as she is very observant in her experiments. Baker’s books don’t show us how they arrived at a certain result. How a recipe was tweaked is just as interesting as the final recipe itself. Nuances and details I haven’t encountered in my baking come to light in her writing. I know I’ll learn much from reading her blog.
One more person I’d like to nominate is Hilda with Along the Grapevine. I am so impressed with all the wild and foraged plants she continues to feature with tasty creative recipes. You have to respect someone who has educated themselves so much about naturally found food. That’s what I call being in touch with nature. I also like her conscientious and cautious attitude in her approach to foraging. My neighborhood, which has a wide variety of wild plant life, or the nearby natural park where I walk my dogs probably have a large number of perfectly edible snacks which I’m not aware of. She has at least raised my awareness of foraging, even though I can’t identify very many wild plants.

A chipotle “flatbread” with black beans (pre-vegan photo).

The iconic ceramic rooster always reminds me of our family kitchen.
Thank you very much for reading! It’s what makes it worth it.
Huaraches

I cannot recall whether ever I’ve seen these in my Central Texas area of Austin and San Antonio. They are more likely to be found in a small family owned restaurant with close ties to Mexico. They are a popular snack or meal in Mexico where they can be found in restaurants or as street food. The base for these is nothing more than corn tortilla dough pressed and shaped like a huarache (sandal) and then cooked very much like a tortilla. They are thicker and so a little more substantial than the flexible tortilla. You can top them with whatever you desire. Taco, mollete, or chalupa fillings are several points of departure. I’m opting for refried black beans, pan roasted nopal (cactus), and a homemade salsa. Epazote, which I used in the beans and as garnish worked well with the other flavors. Recipes will follow.
Huaraches are more of a street or rustic, almost messy affair in its presentation. You usually won’t see much of a garnish on the plate. It’s hard to translate that in my kitchen with foods sometimes. I didn’t even try to recreate that feel. But this is how I would probably serve them for guests or friends in my home. It’s one thing for a street vendor or restaurant to have all the ingredients on hand at all times, putting together plate after plate of food. It’s another for a home cook to make this as a special meal for family and friends.
Another version of huaraches is one where black refried beans are stuffed in a egg-shaped portion of dough. It is then pressed into the oblong shape like this simpler version. I don’t know which style came first.
I very highly recommend using fresh prepared masa from your local tortilleria, or international supermarket. If you must, use masa harina which comes dry and requires the addition of water. Two brands are “Quaker” and “Maseca”. The huaraches taste much better if made from prepared masa. No matter how much I tweaked the dry counterpart , it never could measure up to those made with the fresh masa. When done cooking, the huaraches have a thin crispy exterior and a softer interior. At least that is how I prefer them. It is a wonderful texture and in fact I enjoy eating without the toppings and adding perhaps a drizzle of fresh salsa or olive oil.
If buying fresh masa from your tortilleria, 2 pounds will be plenty. A supermarket may sell it in 5 pound sizes.
You can make them any size you wish. I remember seeing them large enough to fill an entire plate. Small ones make great appetizers. Let your culinary imagination go wild.
Have your toppings all ready before you start making the huaraches. It can be as simple as guacamole or refried beans with pico de gallo or as elaborate as you wish. Once again I’m going vegetarian and vegan. Have you noticed I haven’t mentioned cheese until now?
If using fresh masa, determine if it is moist enough. The masas will differ slightly in moisture depending on the tortilleria. You will very likely need to add water to soften it up. Take a small portion in your hand and flatten it or use a press if you have one. The edges should remain smooth. Mix in water as is necessary to get it to this texture. A tiny bit of cracking at the extreme edges should be okay. Once again, experience is the best teacher here. Don’t forget to season it with salt before you start mixing the water in. For 1 pound of masa, I estimated I added about 1 teaspoon.
If using masa harina, follow the directions for making tortillas as recommended. You will probably have to add more water to get it to the right consistency. Add a little salt for seasoning, about a heaping 1/2 teaspoon per 2 cups. Cover and let sit for about an hour so that the water properly absorbs into the harina. Hopefully you will not have to make some final adjustments.
Let’s start making the huaraches!
If forming the huaraches by hand, you will need two pieces of plastic wrap. If using a tortilla press, use plastic wrap or preferably parchment paper.
It’s important to keep your masa covered at all times to prevent it from drying.
Heat up your cast iron pan or comal to medium. Dab a little bit of vegetable shortening to evenly coat.
By hand: Take a portion of dough and form it into a cylinder. My 2 ounce portions were 4 inches by 1/2 inch in size. Place it on a piece of plastic wrap. Cover it with the other piece and press it into an oblong sandal shape with your fingers. They don’t have to be perfect. Just try to get them about 1/4 ” thick. Carefully remove the top plastic. With the bottom plastic still clinging, pick up the dough, flip it over onto your free hand, and carefully remove the second piece of plastic. Place the dough on your hot pan. It should sizzle as it makes contact. Leave it undisturbed for about 3 minutes, then flip it over. There should be some nice golden spots. You might not avoid a few darker spots. If the huaraches seem like they are browning too quickly, lower the heat. Cook the other side another 3 or so minutes. Flip it again and go another minute or so. It is ready to be topped with your favorite ingredients. If it seems dry throughout, either the dough was not properly moistened or it cooked too long.
With a tortilla press: Form a portion into a cylinder as above, and place it on a tortilla press that has been lined with parchment paper. Cover the dough with another piece of parchment and press to a 1/4 inch thickness. Proceed as above, carefully removing the dough from the parchment paper.


With this tortilla press I had to rotate the dough 180 degrees after a first press, then pressed again to get it to an even thickness.

Huaraches are best eaten right away when still hot. I don’t understand why they are not more popular here since they are easier to make than corn tortillas. Corn tortillas are rarely home made nowadays. It’s convenient to pick them up at the store or tortilla factory. Huaraches are not available pre-made. Maybe that’s why they haven’t caught on. They haven’t been seen that much this side of the border.
I’m kind of excited about this post. I hope my friends are just as excited. I’ll share this with my blogger friends at The Novice Gardener’s Fiesta Friday.

Sourdough Starter
Several readers have expressed a curiosity about sourdough starters. So this post will be dedicated to cultivating a natural yeast. When I decided to get into sourdough baking, it seemed like a very daunting task. I thought, if it works, great, but I’m not putting my hopes too high for my first tries. I was ready for at least several false starts. The three times I’ve made this starter have been successful. My conclusion is that it must not be hard to make a sourdough starter if someone like me, a first timer can make it happen. You’ll be rewarded with making some memorable loaves of bread or other baked goods. If you are thinking about getting into sourdough baking, I encourage you to go in fearlessly. There is very, and I mean very little actual work involved in making your starter. “The waiting is the hardest part.”
This recipe is from Maggie Glezer’s “Artisan Baking”, previously printed as “Artisan Baking Across America”, a favorite book which I frequently enjoy looking through. It has many beautiful photographs, and many great looking recipes from top bakeries in the U.S. This classic book is a must have in my opinion. All three starters I’ve made use this recipe. Curiously enough, there were no photos of the sourdough starter making process.
She calls this a “French-style sourdough starter” though I’m not sure what makes it one. This is a firm starter as opposed to a batter type. It starts out firm and softens up and becomes sticky as it ferments. Because it will quadruple in size in about 8 hours, it’s easy to determine when it is ready to use in a recipe.
This makes about 4 ounces/100 grams sourdough starter. It will take 7-14 days to make with only about 10 minutes active work.
The first day-mixing the first starter
Lukewarm water 1/2 cup (3.5 ounces or 100grams)
Whole rye flour 3/4 cup (3.5 ounces or 100 grams)
In a non-reactive bowl mix the water and rye flour and cover it tightly with plastic. Preferably store it in a sealed plastic or glass container. Let it sit about 2 days. ” It should bubble up, smell, and look awful, and then subside”. It is now ready to refresh.
The third day-mixing the second starter
Unbleached all-purpose flour 2/3 cup (3.5 ounces or 100 grams)
Fermented first starter all
Mix the flour into all the fermented first starter to make a firm dough. Store it as before in a well sealed, clean non-reactive container. Let it ferment for 1 or 2 days. “When it is very sticky and riddled with tiny bubbles, it is ready to refresh. It will have very little aroma and will not rise very much, if at all.”
The fifth day-mixing the third starter
Fermented starter 1/4 cup (2 ounces or 60 grams)
Lukewarm water 3 tablespoons (1.5 ounces or 45 grams)
Unbleached bread flour 2/3 cup (3 ounces or 90 grams)
Measure out the fermented starter and discard the rest. Dissolve it in the water, add the flour, and mix. It will become a fairly firm dough. Tightly seal it and “let the dough ferment until it is sticky and slightly expanded, 1 to 2 days.” After a day, it will not look like it’s doing much. “But if you smell it, it will smell very sour, and if you pull it it with floured fingers, it will be gooey, extensible, and riddled with tiny air bubbles.”
The sixth or seventh day
Make a fourth starter just like you did for the third one. Cover again and “let the dough ferment until it has risen slightly, is full of tiny holes, and has become very gooey, 18 to 24 hours.” It will look as unpromising as the third one.
The remaining days
Continue to refresh the starter exactly as the third and fourth starter. Wait until it has it has fully risen and is starting to fall, until it is able to quadruple in 8 hours or less and has a “sharp and very pleasant smell”. This could take 3 or 4 more refreshments, each taking a little less time than before. The starter is now ready to use.
To refresh a completed sourdough starter
Fermented sourdough starter 1 1/2 teaspoons (0.4 ounces or 10 grams)
Lukewarm water 1 tablespoon plus 2 teaspoons (0.9 ounces or 25 grams)
Unbleached bread flour 1/3 cup (1.6 ounces or 45 grams)
Measure out the starter you need and discard the rest unless you want to use some to make a dough. Dissolve the starter in the water, add the flour, and mix it into a fairly firm dough. Cover tightly in your container and let it ferment for 8 to 12 hours. You should have about 1/3 cup (2.9 ounces or 80 grams) of the dough. In 8 hours or less, it should rise to 1 1/3 cups, at least to its crown.
“Use this refreshment formula to make a sourdough starter that only needs to be refreshed every 12 hours (professionals refresh their sourdough starters every 8 hours). The final starter should be very firm, to buffer its pH, preventing it from dropping too low, and to give it enough fuel to last until next refreshment.”
The starter can be stored in the refrigerator almost indefinitely. Maggie Glezer writes she has kept one in there for 4 months and then was able to revive it to full strength. Old starters will turn grey and exude “hooch”, a clear liquid, but that is normal. To get it back to normal strength, refresh the starter, as directed above every 12 hours 3 to 4 times over, until it is again quadrupling in volume in 8 hours or less. It is now ready to use.

Second day–first starter after 1 day activity

Third day–First starter after 2 days

Fifth day–Second starter after 2 days of activity

Sixth day–Third starter after 1 day
On the subsequent days I continued to refresh as a third starter.
After a couple of daily refreshments it began to rise and fall predictably.
I then began to refresh for a “completed sourdough starter.”

“Completed sourdough starter” refreshed about 12 hours before

Top view “completed sourdough starter” refreshed about 12 hours before
I hope that I have written and presented this in a clear manner. If you are not sure let me know.
A tip I learned the hard way- When discarding starter, use a disposable container, do not throw it down your kitchen drain. The starter will harden and clog up your drain!
The temperature of your kitchen will affect the activity of the yeast. Warmer temperatures will result in faster activity.
After I established the starter, I got into a routine of refreshing twice a day as the recipe states.
You will find many different recipes for making a starter. Some use ingredients like pineapple juice or grapes to help jumpstart the process. These are not required for success.
It seems that every baker has a different nomenclature for the process. It can be very confusing when comparing recipes.
Whole rye flour is used at the very beginning to provide the right nutrients and amount of sugars.
During the first week, I use bottled water, since chlorinated water can slow down the activity.
In the beginning, all-purpose flour is used because it has more starch and thus more nutrients than higher gluten flour.
It’s surprising how noisy sourdough cultures can be. Put your ear to it every once in while and listen to the feast that is going on in there!

Success! Crumb of first bread made with this starter.
Cilantro and serrano pepper flour tortillas

When I started thinking about making these tortillas, I didn’t quite imagine how much flavor the cilantro would add to them. I thought the cilantro taste would dissipate and not serve much purpose. These came out as a very pleasant surprise. I’m not sure if it’s because the cilantro is just lightly cooked, or that it’s juxtaposed with just one or two other ingredients, but its green herbal flavor comes out in a way that I’ve never tasted before. It’s fully present in this tortilla. I use Serrano pepper for a little added heat. This recipe will also give you soft flexible tortillas.
One of the tricky parts in making flour tortillas is adding the correct amount of water. Start with 3/8 cup lukewarm water and add by teaspoon until it is the right consistency. If you squeeze a small portion between your thumb and fingers, it should give easily, but not be too wet. If it’s too dry, it will feel harder and perhaps show little cracks. You just have to try it yourself. In my opinion, making consistently good tortillas is just as difficult as being comfortable with making a complex loaf of bread. I’m still working on both!

For 10 medium size tortillas
2 cups all purpose flour
1/2 teaspoon baking powder
1 scant teaspoon of table salt
2 ounces vegetable shortening
3/4 loosely packed cup chopped cilantro (I include some stem)
1 large Serrano pepper diced
3/8 cup lukewarm water plus several teaspoons as needed
Put the flour, baking powder, and salt in a mixing bowl and mix well. Add the vegetable shortening and using your fingertips, disperse it evenly into the mix. Add the Serrano pepper and cilantro and incorporate. Now add the 3/8 cup of water and begin to form the dough. Add more little by little as needed to make a somewhat moist dough. As a tip, I add a little less water than I think will be necessary because kneading seems to draw out moisture from the pepper and or cilantro. Knead for about 5 minutes, adding water as is required until the dough becomes smooth. I don’t take it to the elastic stage. I also want to point out that if you are sensitive to hot peppers, kneading the dough may bring you in too much contact with them.
Using a pastry cutter or knife, divide into 9 or 10 portions. Form them into balls much like you would if you were shaping bread rolls. Cover them with plastic and let them rest for about 45 minutes to an hour.
Heat your heavy skillet, cast iron pan, or comal to medium. Begin rolling out the balls of dough into rounds. You may need to very lightly flour your work surface and rolling pin. Roll them out thin. As you roll them one by one, put them on the pan, and let cook for about 30 to 45 seconds. Turn them over and cook an equal amount of time. Flip it over once more and cook just a little longer. You should see a few golden brown spots. Remove when done. Keep them warm in your tortilla holder, or put them in a kitchen cloth and store them in a plastic bag.

Vegan tacos made of olive oil roasted potato, teardrop cherry tomatoes, habanero pepper, red onion, cilantro, and lime juice made a filling meal.

I think I’ll contribute this to Angie’s (aka”The Novice Gardener”) weekly Fiesta Friday, where many chefs and storytellers share their fabulous creations. You might want to see what’s going on over there.
Sourdough bread w/wild mushrooms and herbs

When I made my “Wild Mushroom Bread” almost a year ago to the day, I was determined to adapt it to a sourdough version. It just seemed like a natural fit, the earthy flavor of the mushrooms mingling with the fuller flavor and texture of a natural yeast leavened bread. The experience of struggling with the mushrooms last time was helpful in baking this sourdough. It was trial and error trying to get a good mushroom flavor and managing a dough that didn’t want to stop getting wetter from the mushrooms that were releasing their liquid. It worked out in the end though and made for a smoother process this time around. The value of taking notes can’t be underestimated. I’m adding the herbs so I can qualify for the Novice Gardener’s Fiesta Friday Challenge #1 of making something using yeast and herbs. Her idea of using herbs really enhances this bread. It’s been interesting to see all the different breads some of my blogger friends have been making. I’m amazed at some who have only been working with yeast a very short time, cranking out great looking breads like if they have been doing it for years!
The liquid from rehydrating the dried mushrooms adds great flavor and color to the crumb. Porcinis seem to have the most flavor but I went with a blend. Dried mushrooms can be expensive, but you don’t need to buy much. Some of the ones I used this time kept well preserved from last year. I add the Portabellos to give the crumb some pockets of meaty mushroom bite. The herbs are in the background so next time I may add a couple more teaspoons of each. One other note is that the crumb is a bit moister than usual, most likely due to the mushrooms in the dough. I am very satisfied with how it all came out.
Special equipment I used are bannetons, a peel, a baking stone, and water sprayer. I’ve found these very helpful, almost indispensable in making bread, especially sourdoughs.
I’m a self-taught bread maker, learning through mistakes, trial and error, and reading books by the masters. My sourdough baking is continually being developed based on methods from Chad Robertson’s “Tartine Bread” and from Maggie Glezer’s “Artisan Baking Across America”. As I’ve mentioned before, get these books if you want more elaborate explanation of the process.

For 3 medium size loaves
The levain
3/4 tablespoon sourdough starter(refreshed about 8 hours before)
100 grams water (78 degrees)
100 grams bread flour
The dried mushrooms:
3 cups blend of dried mushrooms
6 cups water
The fresh mushrooms:
2 pounds Portabellos (after removing the stems)
Several tablespoons olive oil to sauté with
The final dough:
All the levain
650 grams of mushroom liquid
650 grams bread flour
350 grams whole wheat flour
20 grams salt w/50 grams mushroom liquid
1 tablespoon plus 1 teaspoon fresh chopped rosemary
1 tablespoon plus 1 teaspoon fresh chopped sage
All the rehydrated dried mushrooms
All the sautéed Portabello mushrooms
For the levain:
The night before you make the bread dissolve the sourdough starter in the 100 grams water in a small bowl. Add the 100 grams bread flour and mix until all the flour is moistened. Cover with plastic and let it sit overnight at room temperature. It should take about 7 to 8 hours to ferment properly. To determine if it’s ready, put a spoonful in a small amount of water. If it floats it is ready to be used.
It’s also recommended that the dried and fresh mushrooms are prepared the day before.
For the dried mushrooms:
Heat the 6 cups of water in a pot until very hot. Put the dry mushrooms in, remove from heat and let them soak at least 1 hour. When they have softened, drain them, saving the liquid. Try squeezing out some of the juices from rehydrated mushrooms, again saving the juice. Store the mushrooms and liquid overnight covered in the refrigerator.
For the Portabello mushrooms:
Remove the stems and lightly rinse the mushrooms. Scrape off the underside if you desire, especially if it seems gritty. Slice the mushrooms thin and into about 1 inch pieces. Put a little olive oil in a medium hot sauté pan and cook until the pieces have softened. Try to use as little oil as possible. Lay them on a dish or paper towel to soak excess oil. Put in a covered container in a refrigerator overnight.

On the day of baking:
Remove the mushrooms and liquid from the refrigerator to get to room temperature.
In a large bowl, dissolve the levain in the 650 grams of mushroom liquid. There should be enough from the night before. If not, add water to compensate. In a separate bowl, stir together the bread flour and whole wheat flour. Add it to levain-mushroom liquid mixture and incorporate well until it is all moistened. Cover with a moist towel and let it autolyse for about 30 to 40 minutes. This period allows the gluten to begin to develop. You’ll notice a radical change in the dough. Dissolve the salt in the 50 grams mushroom liquid and add to the dough by squeezing it in.
Put the dough in your stand mixer and mix for 5-6 minutes or until it has become smooth and elastic. It should stick to bottom of the bowl. During the last minute add the herbs. Remove from the bowl and put it on a work surface. Add the rehydrated and Portabello mushrooms by gently folding in. It will take some patience to get them all in! If the dough is getting too wet, add more bread or whole wheat flour and knead. The dough should still be sticky at the end of the process. I ended up adding almost 200 grams of flour, so I might cut back on mushroom liquid next time.
Put the dough in a lightly oiled container, oil the top, and cover. I like to put it in a transparent container to see the development. After 30 minutes, grab the lower portion of the dough and stretch it over the top. Repeat this motion a couple more times. This is called a “turn”. Wait another 30 minutes and give it another turn. Repeat this one more time for a total of 3 turns. Let the dough continue fermenting for about 1 1/2 to 2 hours more. The dough should rise about 20 to 30 percent in volume. If you put it in a transparent container, you’ll notice little air pockets. The timing depends much on the temperature of your kitchen. You must make the call as to when the dough fermented properly.
When it is ready, carefully take it out of the container. Try not to disturb it too much so that the air pockets are maintained. Divide the dough into 3 equal portions. Using a pastry scraper, shape each into a ball. Try to create surface tension by tucking in around the underside. Very lightly flour the tops and cover with plastic. Let them rest for 30 minutes. Take one of the balls and turn it upside down. Imagine an east, west, south and north side of the dough. Take 1/3 of the east side, stretch it, and put it over the middle. Repeat with the west, south , and north. Flip the dough over back so that the folded side is on the bottom. Repeat with the other portions.
Line your bannetons with a clean light kitchen cloth and dust with flour. Place the portions of dough in them upside down, lightly spray with oil, and then cover with plastic. Cover with the overhanging cloth. Let them ferment 3 to 4 hours. It depends on the ambient temperature. The warmer it is, the faster it will ferment. They will rise somewhat, maybe 30 per cent.
You should have your oven preheating to 500 degrees with a stone in place a good 30 minutes in advance of baking time.
Cut out 3 pieces of parchment paper large enough to hold each of the risen dough. Uncover them, removing the plastic and place the parchment paper on them. Put your peel on top and turn upside down. Remove the banneton and cloth to expose the dough. Slash as desired and with the help of the peel, put it in the oven. Place however many will comfortably fit on your stone, lower the oven temp to 425 and bake about 20 to 25 minutes or until the internal temperature of the bread reads 200 degrees. During the first 10 minutes I spritz the oven with water to mimic a professional steam injected oven. Remove from the oven and let cool on a rack before slicing. If you have to bake in two rounds because of oven space, remember to readjust the temperature.

My sourdough breads have a bit of “tang” but it is always a very mild pleasant sourness, never assertive. Once I fermented a dough overnight and then longer at room temperature. It came out too tangy for my taste. The kitchen temperature this time around was about 5 to 6 degrees warmer than usual. I noticed the dough rose faster and higher than normal for the same amount of time. I also noticed that the bread had slightly more tang to it. That slight amount of temperature difference made a significant change in the behavior of the dough.


Sopa de Fideo (Vermicelli Soup)

The fideo, or vermicelli I grew up with was more of a Tex-Mex version my mom and grandma prepared for us. It is served as a side along with frijoles and whatever the meat of the day was, whether it be picadillo, carne guisada, or tacos. It is simple delicious food, fideo being the pasta of choice for us when we want to stay in our “comfort” zone. Our family’s version, called sopa seca de fideo, is on my list to make for a post. Another way is to make it more of a soup. The basic traditional method is to brown the vermicelli in oil and add a puree of raw tomatoes, onions, and garlic. It is then simmered in broth with desired spices until the vermicelli is done. Meat or vegetables may be added as an option. For this version, I’m adapting techniques for making salsas. It is well worth the extra effort in roasting the tomato, garlic, and dried chiles to get that extra depth of flavor. Since I’ve been keeping on a vegetarian path, I’m adding additional roasted vegetables to make it more of a complete meal. Vegetarian Tex-Mex is something of an oxymoron isn’t it?
As I was working on this, Sonal from simplyvegetarian777 posted the very tasty looking Savory Vermicelli/Namkeen Jawe , her comfort food version of vermicelli. It was an eye-opener for me to see it flavored with Indian spices!
This recipe makes about 5-6 cups of soup.
2# Tomatoes
1 small onion (about 8 ounces)
3 medium unpeeled garlic cloves
1 small bay leaf
3/4 teaspoon dried oregano
1 ancho chile
1/2 (dry)chipotle chile
8 cups vegetable stock (or water with vegetable bouillon)
5 ounces fideo (vermicelli)
salt to taste
Optional vegetables:
eggplant
Mexican squash (or other favorite squash)
ear of corn
carrots
Optional fresh herbs to garnish:
Cilantro
Oregano
Epazote
Roast the vegetables:
Slice the tomatoes in half lengthwise and put them cut side up on a lightly oiled baking pan. Roast them in a 350 degree oven for about 30 minutes. They should lose some volume and turn a slightly darker color. Remove and let cool.
Slice the onion lengthwise in 1/4″ to 1/2″ thick pieces. Place them on a heavy skillet or comal that is heated over a low-medium fire. Let them slowly pan roast, turning them from time to time. They should soften and perhaps slightly char in some spots. Remove and let cool. Do the same with the garlic cloves. They will also soften up. Peel them when they are cool enough to handle.
Remove the seeds from the dried peppers. Put them on the heavy skillet and press down with a metal spatula to toast them. With a hot skillet it should take only seconds. Turn them over to toast the other side.

Place the tomatoes, onion, and garlic in a blender. Pour enough of the vegetable broth to cover the vegetables. Puree, adding more broth as necessary to make a smooth mixture. Pour it into deep pan, add the rest of the broth, and bring to a boil. Immediately lower to a simmer. Add the bay leaf and dried oregano and continue to simmer until it reduces by about 1/3. It should still have enough liquid to boil the pasta.
While the soup is simmering, heat a pan over medium heat and add a couple of tablespoons of oil. Lightly brown the fideo and remove from the pan. Drain if necessary. You may have to work in 2 batches.
At this point you can also roast the optional vegetables. The vegetables in my list are just suggestions. You may have other ideas. Cut them into small dice and toss with olive oil, salt and pepper. Lay them on a baking pan and roast in a 400 degree oven until done. You may also choose to simply sauté the vegetables in a pan. If using corn, roast with the husk on until done. Don’t let it overcook to the point of wrinkling. Slice the kernels from the cob.
Put the cooled down vermicelli into the readied soup and simmer until the pasta is cooked al dente, about 15-20 minutes. If the soup is too thick, you can add more broth. Season with salt.
To serve, ladle the soup in an individual bowl, add the roasted vegetables and garnish with chopped cilantro, oregano, or epazote. Crumbled Mexican cheese is optional but I’m keeping this vegan. Serve with Mexican bread rolls, French bread or a similar nice crusty loaf.

Epazote is a distinctive pungent herb that is used in Mexican cooking. It is often used for example in black bean or tortilla soups. Many like to simmer it in the soups. I like the pungency of the fresh epazote and so use it as garnish. Look for it in a Latin supermarket. It is an herb that readily grows wild, but I have yet to see it in my neighborhood. There is no substitute for its flavor.
Even though there are only a few ingredients, the method of cooking brings out a very rich and hearty flavor. This is a warm and satisfying soup.
If you prefer to spice it up differently, you can use comino, chile powder, jalapeno pepper or other types of dried chile. Those 2 peppers I included gave it a good amount of heat.
Be sure to use a nice well balanced vegetable stock. Sometimes I will add a vegetable bouillon cube or two if necessary.
A nice thing about this sopa is that it is well suited for individual interpretations, depending on what you have on hand.
I think I’ll be joining the nice folks at the Fiesta Friday hosted by Angie (aka The Novice Gardener), who is really not a novice at gardening or cooking.
